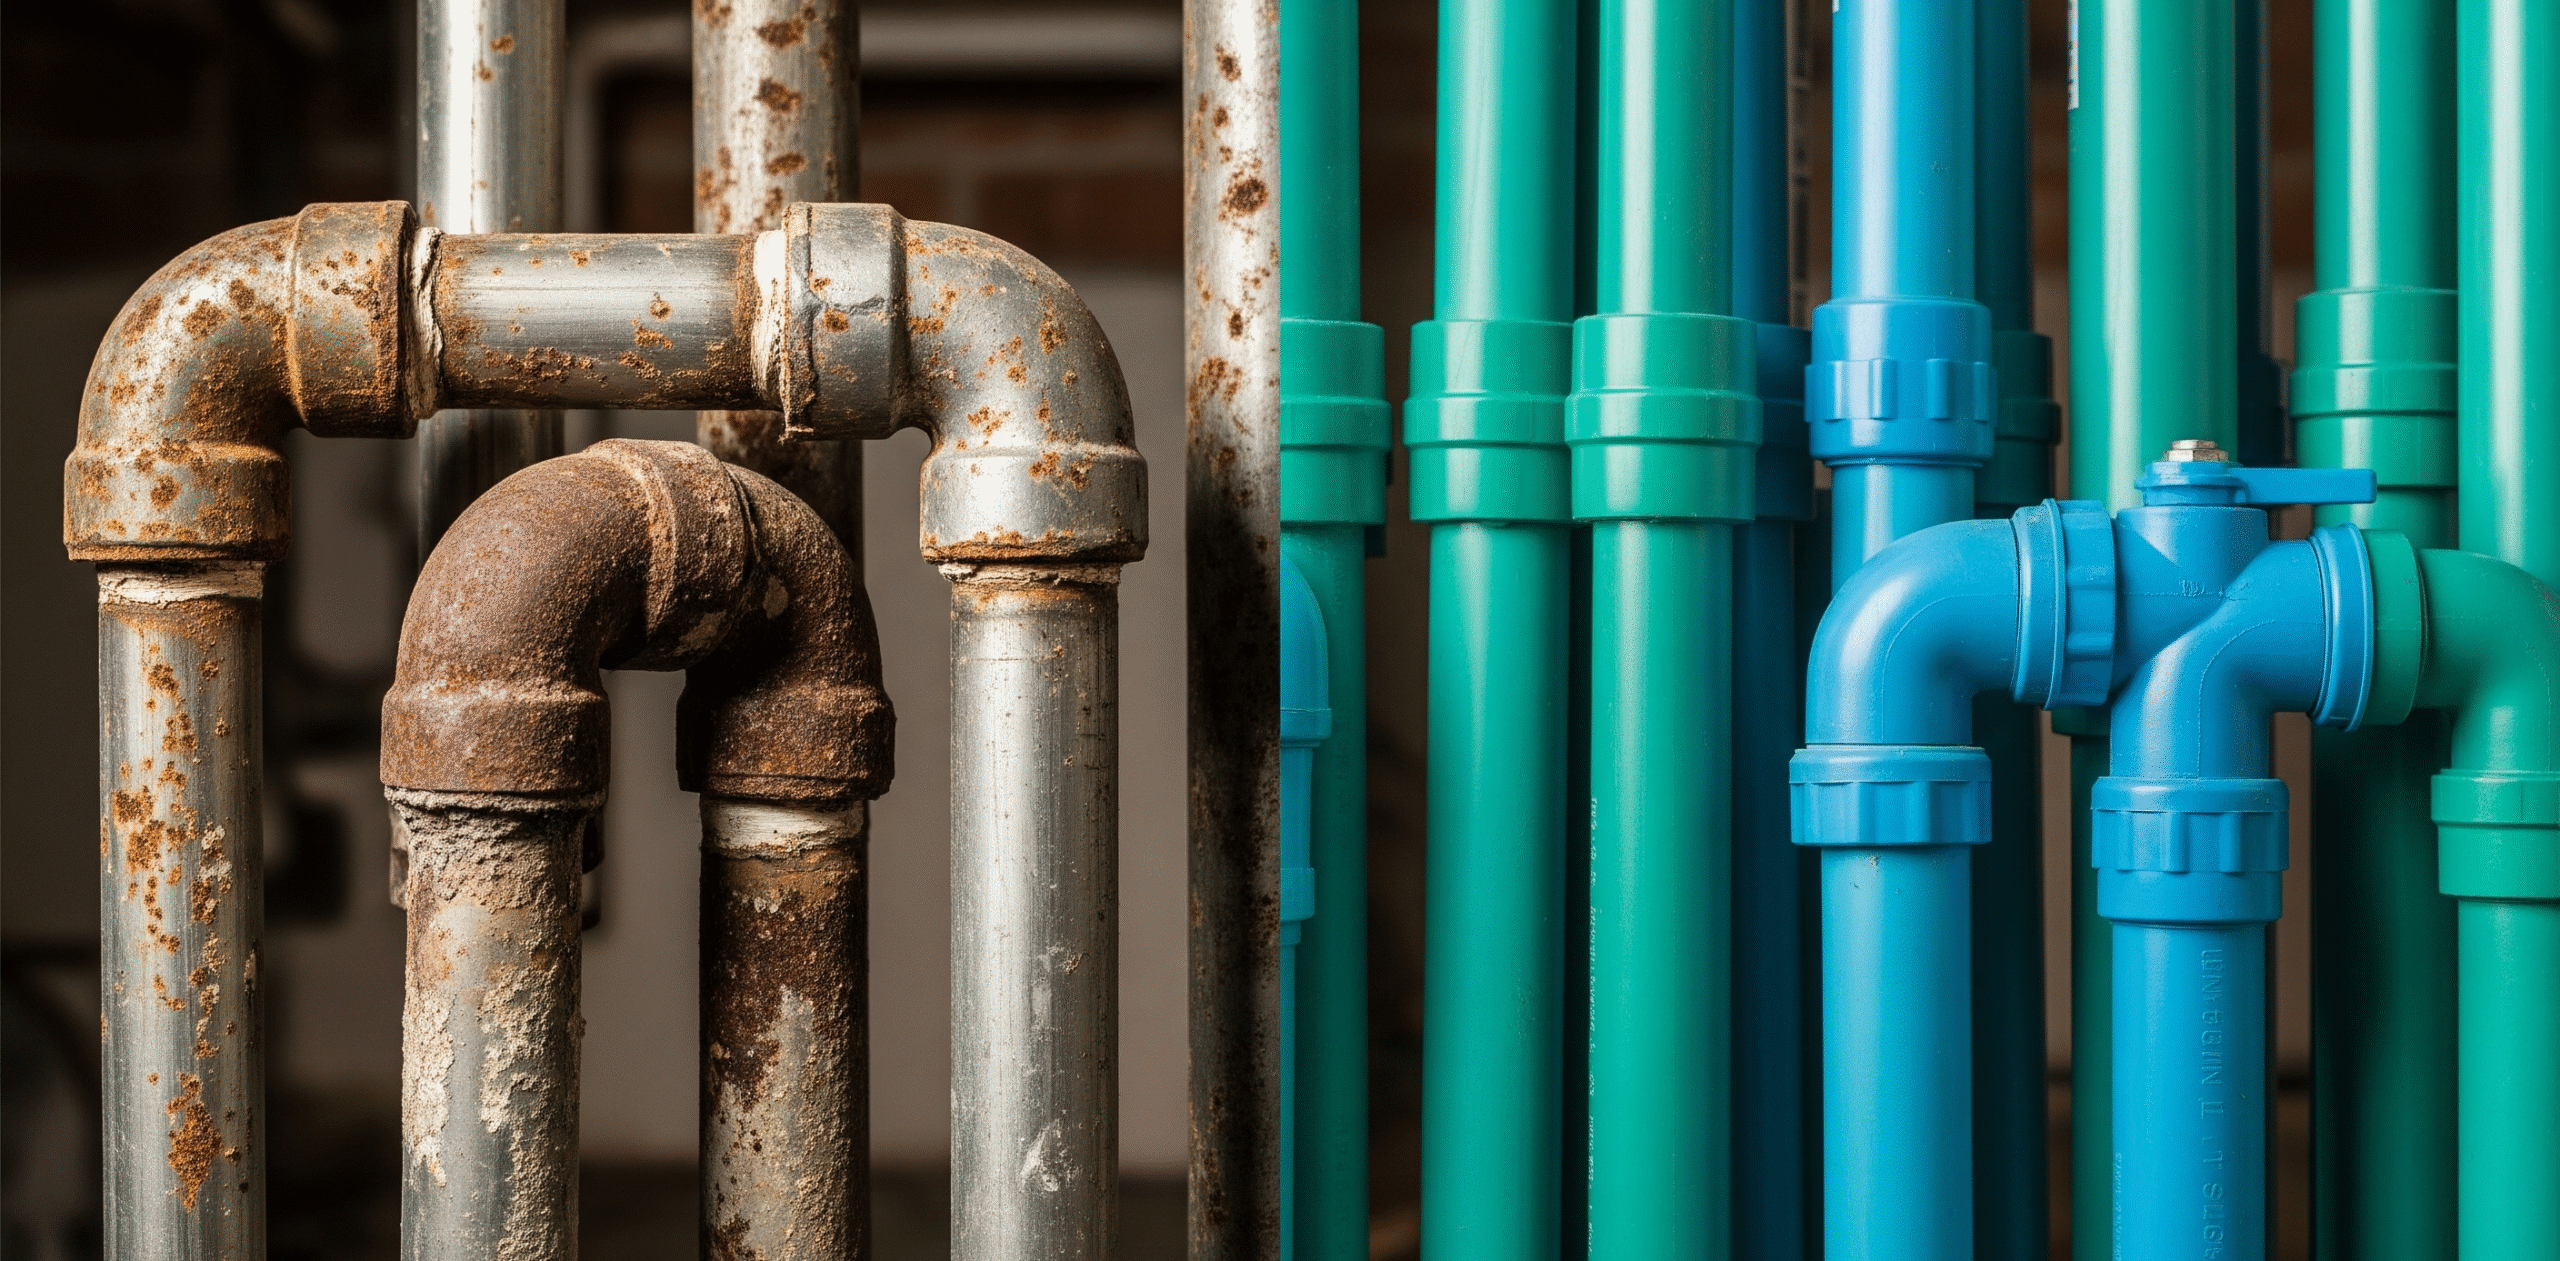
Every seasoned plumbing professional in Kenya understands the challenges of aging infrastructure. The moment you see outdated galvanized steel pipes, you know that repiping a house in Kenya might be the necessary solution. At Winstar Hardware, we provide the expert insights and top-quality supplies you need to tackle these significant projects with confidence.
While galvanized steel was a common plumbing material for many decades, time and the unique water conditions often found in Kenya can take their toll. Corrosion, reduced water flow, and the potential for leaks make repiping a necessary upgrade for many older homes. This comprehensive guide will walk you through the key considerations, best practices, and material choices involved in repiping a house in Kenya, equipping you with the knowledge to tackle these jobs with confidence and expertise.
Why Repiping Galvanized Steel is Often Essential
While galvanized steel was a common plumbing material for many decades, its protective qualities degrade over time. The unique water conditions often found in Kenya can accelerate this process, making repiping a house in Kenya a necessary upgrade for many older homes. This section provides a detailed breakdown of the critical issues that make upgrading from galvanized steel not just a recommendation, but often an essential renovation.
Corrosion and Rust
Galvanized steel pipes are coated with a protective layer of zinc to prevent the steel from rusting. This process, known as galvanization, works by using the zinc as a “sacrificial anode.” The zinc corrodes before the steel, providing a barrier that prevents oxygen and water from reaching the iron in the steel. However, this protective coating is not permanent.
Over time, and especially in areas with hard water or high mineral content, the zinc coating begins to degrade. The chemical reaction between the water and the zinc wears away the protective layer, exposing the underlying steel. Once the steel is exposed, it reacts with oxygen in the water to form rust, or iron oxide. This internal rust and mineral deposit accumulation is the primary cause of several major plumbing issues.
- Discolored Water: As the pipes corrode, rust particles and sediment flake off into the water supply, causing it to appear discolored, brown, or rusty. This is a major concern for homeowners and a clear sign that the internal structure of the pipes is failing.
- Health Implications: Beyond affecting the water’s taste and appearance, corroded pipes can leach heavy metals into the water supply. While small amounts may not be immediately harmful, long-term ingestion of rust and other metal particles can be a health concern
The Hydraulic Principles of Reduced Water Pressure
One of the most frustrating symptoms of aging galvanized steel pipes is a significant drop in water pressure. This isn’t just due to a leak; it’s a direct result of internal corrosion. As rust and mineral deposits build up on the inner walls of the pipes, they effectively shrink the pipe’s internal diameter.
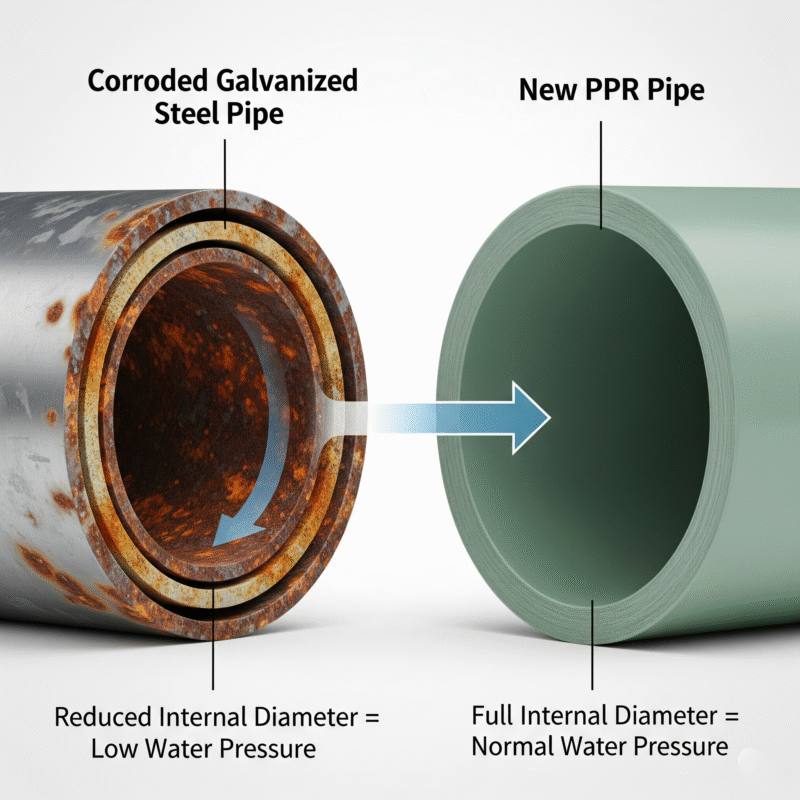
Think of it like a clogged artery: the narrower the passage, the more difficult it is for blood to flow through. The same principle applies to water. This reduced internal diameter creates a bottleneck, significantly increasing the friction and resistance that the water encounters as it travels through the pipes. The result is a dramatic decrease in water flow and pressure at faucets, showers, and appliances throughout the house. While you can address this temporarily by increasing the pressure at the main supply, this only puts more stress on an already failing system.
Frequent Leaks
Corrosion not only reduces the internal diameter but also thins the pipe walls. As the rust eats away at the steel, the pipe becomes weaker and more susceptible to developing leaks. These leaks often start as small, pinhole-sized drips but can quickly turn into major problems, leading to significant water damage and mold growth.
A common mistake is to address these leaks one by one. However, in an aging galvanized system, a leak in one section of the pipe is often a warning sign that the entire system is nearing its end. The most cost-effective and long-term solution is to address the root cause by repiping the entire house. This proactive approach prevents future, more costly repairs and ensures the integrity of the plumbing system for decades to come.
Long-Term Cost Savings
While repiping a house in Kenya is a significant initial investment, it can save homeowners money in the long run. The cost of frequent, emergency repairs from leaks and water damage can quickly exceed the cost of a single, well-planned repiping project. Additionally, a new, clean plumbing system improves water flow and pressure, which can also contribute to water efficiency. Ultimately, a new plumbing system prevents costly repairs from frequent leaks, improves water efficiency, and can potentially increase the property’s value.
Pre-Project Assessment and Client Consultation
A successful repiping a house in Kenya project begins not with a wrench, but with a thorough assessment and a clear conversation. Taking the time to properly diagnose the problem and communicate a transparent plan with the homeowner is crucial for managing expectations, building trust, and ensuring a smooth project from start to finish.
The Plumber’s Assessment Checklist
Before you provide a quote, conduct a detailed inspection of the existing galvanized steel system. Use this checklist to ensure you have a complete picture of the situation:
1. Visual Inspection:
- Visible Pipes: Inspect all exposed pipes in basements, utility closets, and under sinks for signs of external rust, leaks, or significant discoloration.
- Fixture Performance: Test all faucets, showers, and toilets. Note areas with visibly low water pressure or discolored water.
- Signs of Previous Repairs: Look for evidence of past repair work. Frequent patching or pipe replacements are a red flag that the system is failing system-wide.
2. Pressure and Flow Analysis:
- Flow Test: Conduct a flow test to quantify the reduction in water pressure. This provides a data-driven justification for your recommendation and helps the homeowner understand the extent of the problem.
- Water Quality Check: Take a water sample to check for rust or sediment. You can show this sample to the homeowner as a clear visual aid.
The Client Consultation Template
Once you have completed your assessment, sit down with the homeowner and use this template for a comprehensive, transparent consultation.
1. Present the Findings:
- Clearly and simply explain the problems you’ve identified, using your visual observations and the results of your flow test.
- Use terms the homeowner can understand, such as “clogged arteries” for the internal pipe buildup, to make the technical details relatable.
2. Explain the “Why”:
- Explain why addressing the problem now is more beneficial than waiting. Emphasize the long-term benefits, such as preventing costly emergency repairs, improving water quality, and increasing the home’s value.
3. Discuss Material Options:
- Present the best-suited replacement materials for the project, such as PPR and PEX.
- Explain the pros and cons of each, including their cost, durability, and installation process, to help the homeowner make an informed decision.
4. Provide a Detailed Project Plan and Quote:
- Present a transparent quote that includes a breakdown of costs for materials, labor, and any necessary permits.
- Outline the proposed piping route and design.
- Provide a clear, estimated timeline for the project’s completion, including steps to minimize disruption to the household.
- Clarify what is and is not included in the quote to prevent misunderstandings later on.
By following a structured process for both assessment and consultation, you not only provide an accurate quote but also build a trusting relationship with your client, which is essential for a successful project.
Planning the Repiping Project: Key Considerations
A successful whole-house repiping project requires careful planning and communication with your client. Here are essential factors to consider:
Material Selection
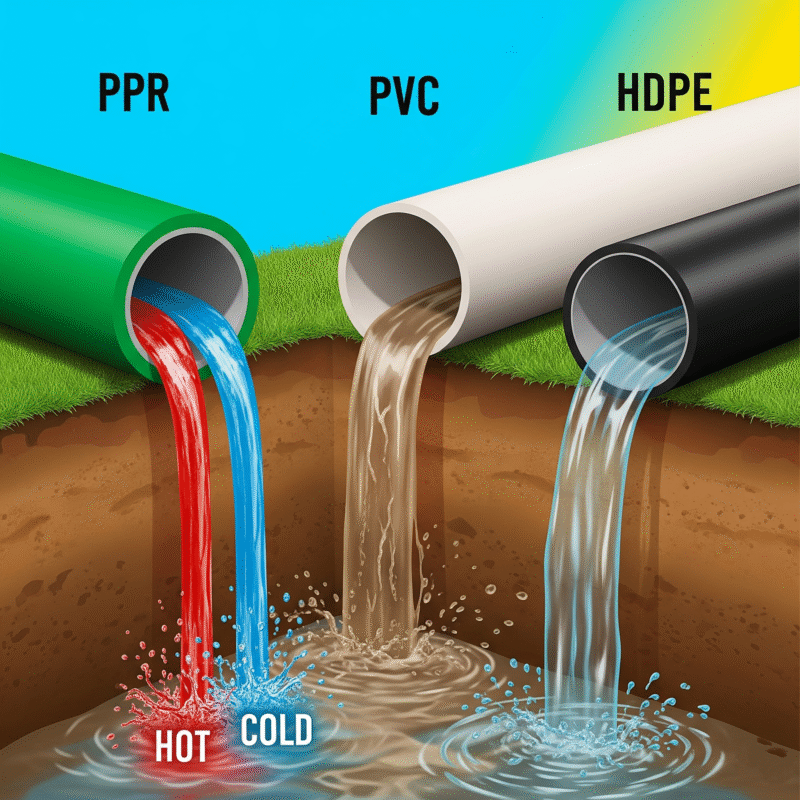
Choosing the right replacement material for repiping a house in Kenya is crucial for a successful project. In Kenya, the most common and recommended options for residential repiping are PPR (Polypropylene Random Copolymer) and PEX (Cross-linked Polyethylene). Both materials offer significant advantages over traditional galvanized steel, but they each have unique characteristics that make them suitable for different applications.
Here is a comparison of PPR and PEX to help you make an informed decision:
| Feature | PPR (Polypropylene Random Copolymer) | PEX (Cross-linked Polyethylene) |
| Cost | Generally more affordable than PEX. | Can be more expensive per foot than PPR. |
| Flexibility | Rigid piping that requires fittings for all turns and connections. | Highly flexible, allowing it to be bent around corners. This reduces the number of fittings needed. |
| Heat Resistance | Excellent heat resistance, making it an ideal choice for both hot and cold water systems. | Very good heat resistance, suitable for hot and cold water systems. |
| Durability | Resistant to corrosion, strong and durable, with a long service life. | Durable and resistant to corrosion and scaling. |
| Installation | Requires a specialized heat fusion welding tool to create strong, leak-proof joints. | Easier to install due to its flexibility. Connections are made with crimp rings or expansion fittings. |
PPR Installation: The Art of Heat Fusion
PPR pipes and fittings are joined using a process called heat fusion welding. This method involves a specialized tool that heats both the pipe and the fitting to a specific temperature. The two pieces are then pressed together, creating a permanent, leak-proof bond that is stronger than the pipe or fitting itself.
Tools required for PPR fusion:
- PPR heat fusion welding tool
- Pipe cutters
- Calibrator tool (for larger pipes)
PEX Installation: The Simplicity of Mechanical Connections
PEX is favored for its flexibility, which allows it to be run in continuous lengths, reducing the need for multiple fittings and minimizing potential leak points. There are two primary methods for joining PEX pipes:
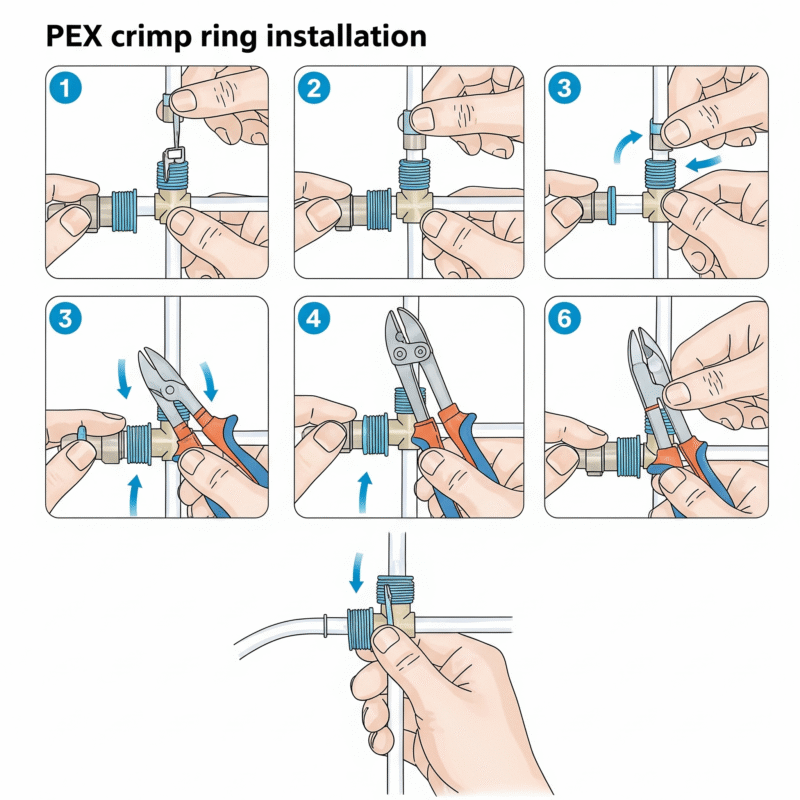
- Crimp Rings: This method uses a copper or stainless steel ring that is crimped onto the fitting and pipe with a specialized tool.
- Expansion Fittings: This method uses a tool to expand the PEX pipe, allowing the fitting to be inserted. The pipe then shrinks back around the fitting, creating a very tight seal.
Tools required for PEX installation:
- PEX pipe cutters
- Crimp or expansion tool (depending on the chosen method)
By understanding the distinct characteristics and installation requirements of each material, you can confidently recommend the best solution for your client’s home and budget
Piping Route and Design
Careful planning of the new piping layout is a critical step in a successful repiping project. A well-thought-out design minimizes pressure loss, reduces material waste, and helps to minimize disruption to the homeowner’s daily life.
Planning for Optimal Water Flow
The primary goal of a good piping design is to ensure optimal water pressure and flow to all fixtures.
- Direct Routes: Always aim for the most direct routes possible from the main water supply to each fixture. This minimizes the number of fittings, which are a common source of pressure loss and potential leaks.
- Fewer Connections: With flexible materials like PEX, you can run continuous lengths of pipe, which significantly reduces the number of connections required. For rigid materials like PPR, plan the route to use as few elbow fittings as possible.
- Minimizing Friction: Long, winding pipe runs increase friction, which reduces water pressure. A strategic layout can prevent this and ensure consistent pressure throughout the house.
Integrating with Existing Fixtures and Future Renovations
A good design considers both the present and the future.
- Existing Fixtures: The new piping must connect seamlessly to all existing fixtures, including sinks, showers, toilets, and the water heater.
- Future Renovations: Discuss any potential future renovations with your client. If they plan to add a new bathroom or extend the kitchen, you can “stub out” the new pipes during the current repiping project. This saves time and money for the homeowner down the road.
The Importance of Client Consultation
Before beginning any work, it is essential to discuss the proposed routing with your client.
- Address Concerns: Homeowners may have concerns about where new pipes will be run, especially if it involves cutting into walls or ceilings. Clearly explain your proposed plan and address any concerns they may have.
- Set Expectations: Show the client where access holes will need to be made and explain how you will minimize the visual impact. This helps manage expectations and ensures a smoother process.
- Final Approval: Obtain the client’s final approval on the piping design before you begin demolition and installation. This confirms that you are on the same page and helps prevent costly changes later on.
Repiping a house in Kenya can be an invasive process that temporarily disrupts a homeowner’s daily routine. As a plumbing professional, your goal is to complete the project efficiently while minimizing inconvenience and maintaining a clean, safe work environment.
Minimizing Disruption
Strategies to Minimize Disruption while repiping a house in Kenya
- Work in Sections: Instead of shutting down the entire plumbing system at once, you can plan the project to be completed in sections. For example, you can repipe the kitchen and one bathroom on the first day, and the remaining bathrooms on the following day. This allows the family to have at least one functional water source at all times.
- Careful Access and Precision: The most disruptive part of a repiping project is often the cutting of access holes in walls and ceilings. Use precise and careful cutting techniques to make holes as small as possible and in discreet locations (e.g., inside closets or behind appliances). This minimizes the amount of restoration work required after the plumbing is complete.
- Establish a Clear Work Schedule: Before you begin, discuss a clear work schedule with your client. Agree on start and end times for each day, and make sure they are aware of when the water supply will be turned off and for how long. This simple act of communication can help the homeowner plan their day and manage their expectations.
- Thorough Cleanup: At the end of each day, perform a thorough cleanup of the work area. This includes removing all debris, dust, and tools. Leaving a clean work site not only shows respect for the homeowner’s property but also reduces safety hazards.
Repiping a house in Kenya is not just a major home renovation; it’s a significant alteration to a home’s infrastructure. To ensure the work is done safely and correctly, it’s crucial to comply with all local building codes and regulations.
Permits and Inspections
The Importance of Plumbing Permits
A plumbing permit is a formal approval from a local authority, such as a county or municipal office, that allows you to proceed with a plumbing project. Obtaining a permit is important for several reasons:
- Safety: Permits ensure that the work performed meets established safety standards and regulations, protecting both the inhabitants of the home and future buyers.
- Compliance: The permit process ensures that your plumbing project complies with the local building code, which is designed to protect public health and safety.
- Property Value: Performing work without a permit can create issues when selling a home. Unpermitted work may be flagged during a home inspection, potentially devaluing the property or requiring expensive corrections.
The Inspection Process
Once a permit is obtained, a qualified building or plumbing inspector inspects the work. This is not a punitive process but a collaborative one, as they are there to ensure the work is done correctly.
- Rough-in Inspection: This usually happens after the new pipes are installed but before the walls are closed up. The inspector will check the new piping for proper installation, material, and adherence to the approved plan.
- Final Inspection: After the project is complete and all walls are patched, the final inspection is conducted. The inspector will check all fixtures and connections to ensure everything is working correctly.
As a plumbing professional, it’s your responsibility to advise the client on the need for permits and to facilitate the inspection process. This not only protects the homeowner but also reinforces your reputation as a professional who prioritizes quality and compliance.
Quoting and Pricing
A detailed and transparent quote is more than just a price tag; it is the foundation of trust between a plumber and their client. A well-structured quote manages expectations, prevents misunderstandings, and reinforces your reputation as a professional.
What to Include in a Detailed Quote:
- Cost of Materials: Provide a clear breakdown of the cost for all materials, including the type and quantity of pipes (PPR or PEX), fittings, valves, and other necessary supplies.
- Labor Costs: Specify the labor costs for the project. You can present this as a single figure or a breakdown based on an estimated number of hours or days.
- Permits and Inspections: Include the cost of any required permits and inspections. This shows the client you are committed to following local regulations and ensures there are no surprises later.
- Contingency for Unforeseen Expenses: It’s wise to include a small contingency fund (e.g., 5-10% of the total cost) for unforeseen expenses, such as repairing unexpected structural damage or dealing with a plumbing issue that was not visible during the initial assessment.
Defining the Scope of Work and Timeline:
- Scope of Work: Clearly outline what is and is not included in repiping a house in Kenya. For instance, specify that the quote includes the repiping but does not cover the cost of repainting walls or replacing tiles that had to be removed for access.
- Estimated Timeline: Provide an estimated timeline for completion. Break down the project into phases, such as demolition, installation, pressure testing, and restoration, so the homeowner knows what to expect each day.
- Payment Schedule: A transparent payment schedule, such as an initial deposit, progress payments, and a final payment upon completion, helps to manage the client’s finances and keep the project on track.
By providing a clear and comprehensive quote, you demonstrate professionalism and give the client the confidence that they are making a wise investment.
The Repiping Process: A Step-by-Step Guide
While the specifics of repiping a home in Kenya may vary depending on the house and the chosen piping material, here’s a general overview of the process:
Preparation:
- Turn off the main water supply to the house.
- Drain the existing plumbing system.
- Protect furniture, flooring, and other belongings from dust and debris.
- Clearly mark the locations of existing pipes within walls and ceilings to avoid damaging them during demolition.
Demolition and Removal of Old Pipes:
- Carefully cut and remove the old galvanized steel pipes. This may require specialized tools like pipe cutters and wrenches. Be prepared for potential corrosion and sediment buildup within the old pipes.
- Dispose of the old pipes responsibly according to local regulations.
Installation of New Pipes:
Following the planned route, install the new PPR or PEX pipes.
- For PPR: Use a heat fusion welding tool to create strong, leak-proof joints between pipes and fittings. Ensure you have the correct training and equipment for PPR fusion. You can find a beginner’s guide to PPR fusion here.
- For PEX: Use crimp rings or expansion fittings with the appropriate tools to create secure connections. Familiarize yourself with the specific installation techniques for the chosen PEX connection method. For a visual guide, watch this video.
- Securely fasten the new pipes to wall studs or joists using appropriate hangers and supports.
Connecting to Fixtures:
- Carefully connect the new pipes to existing plumbing fixtures (sinks, toilets, showers, water heater) using appropriate connectors and shut-off valves. Consider replacing old or corroded shut-off valves for optimal performance and future maintenance. We stock a wide range of high-quality plumbing valves.
Pressure Testing:
- Before closing up walls and ceilings, conduct a thorough pressure test of the new plumbing system to check for any leaks. Gradually introduce water into the system and inspect all joints and connections for drips or signs of moisture.
Restoration and Cleanup:
- Once the system passes the pressure test, repair any access holes made in walls or ceilings. This may involve patching drywall, plastering, or painting.
- Thoroughly clean the work area, removing all debris and ensuring the homeowner’s property is left tidy.
Final Inspection and Handover:
- Conduct a final walkthrough with the homeowner, explaining the new plumbing system and any relevant maintenance recommendations.
- Provide any warranties on your workmanship and the materials used.
Safety and Best Practices: A Guide for Professionals
Repiping a house in Kenya can be a significant undertaking, involving demolition, installation, and the use of specialized tools. To protect both yourself and the homeowner, it is essential to prioritize safety and adhere to best practices throughout the entire process.
Comprehensive Safety Protocols for Repiping a House in Kenya
As a professional, your safety and the safety of the homeowner are paramount. Follow these protocols to ensure a secure work environment:
- Personal Protective Equipment (PPE): Always wear appropriate PPE. This includes safety glasses to protect your eyes from debris, gloves to protect your hands from cuts and scrapes, and a dust mask to prevent the inhalation of dust and other particles generated during demolition.
- Handling Heavy Tools: Use proper lifting techniques when handling heavy equipment, such as pipe cutters and heat fusion welding tools, to prevent back injuries.
- Working in Confined Spaces: Be cautious when working in confined spaces, such as crawl spaces or attics. Ensure there is adequate ventilation and always have a second person nearby in case of an emergency.
- Electrical Safety: Before starting any work, confirm that all power to the work area is turned off to prevent accidental electrical shocks, especially when working near exposed wiring.
Environmentally Responsible Waste Disposal
You cannot simply throw away the old galvanized steel pipes and other construction waste. Disposing of them responsibly protects the environment and demonstrates your professionalism.
- Scrap Metal Recycling: Old galvanized steel pipes can be recycled. You can take them to a local scrap metal dealer in Kenya, who will process the metal for reuse. This prevents the pipes from ending up in a landfill.
- Construction Debris: Any other construction debris, such as old insulation or drywall, should be collected and disposed of according to local waste management regulations.
By implementing these safety measures and best practices, you can ensure a professional, efficient, and secure repiping project from start to finish.
Post-Installation Care and Maintenance
After a whole-house repiping project is complete, the work isn’t entirely done. Providing your clients with a guide for post-installation care and maintenance will help ensure the longevity and optimal performance of their new plumbing system. It also reinforces your professionalism and commitment to long-term client satisfaction.
What to Expect Immediately After Repiping a House in Kenya
- Water Pressure: Your clients will immediately notice a significant improvement in water pressure and flow.
- Water Quality: The water will be clear and free of the rust, sediment, and discoloration that was common with the old galvanized pipes.
- Minor Air in the Lines: It’s normal to have some air in the lines for a short period after the system is turned back on. Advise the homeowner to run their faucets for a few minutes to clear any trapped air.
Long-Term Maintenance and Care
PPR and PEX systems are low-maintenance, but a few simple tips can help ensure their longevity:
- No-Corrosion Advantage: Unlike galvanized steel, the new pipes will not corrode, so your clients don’t have to worry about the buildup of rust or mineral deposits restricting water flow.
- Avoid Harsh Chemicals: Advise clients to avoid pouring harsh drain cleaners or chemicals down their drains, as these can potentially degrade the new piping material over time.
- Protect Exposed Pipes: While PPR and PEX are durable, exposed pipes should be protected from physical damage, such as from lawn equipment or sharp objects.
- Check for Leaks: Advise clients to periodically check under sinks and around toilets for any signs of leaks, although this is very unlikely with a professionally installed system.
By providing these simple maintenance guidelines, you empower homeowners to care for their new system and maximize the value of their investment.
Partner with Winstar Hardware for Your Repiping Needs
At Winstar Hardware, we are your dedicated partner for sourcing high-quality PPR and PEX pipes and fittings for your project in repiping a house in Kenya. Our knowledgeable team can provide you with expert advice on material selection, installation best practices, and competitive pricing. We understand the specific needs of plumbing professionals in Kenya and are committed to providing you with the reliable supplies you need to deliver exceptional results for your clients.
Upgrading from galvanized steel is a significant undertaking, but with careful planning, the right materials, and skilled execution, it’s a project that can provide lasting benefits for homeowners and enhance your reputation as a trusted plumbing professional. Visit Winstar Hardware Ltd today in to discuss your repiping material needs and let us help you equip yourself for success.
Have you tackled a whole-house repiping project recently? Share your experiences and any valuable tips you’ve learned in the comments below to help your fellow plumbers!


One thought on “Repiping a House in Kenya: A Plumber’s Guide”