The day you get the keys to your new home is a monumental moment, filled with the promise of new memories and a fresh start. You envision cozy evenings, backyard barbecues, and the freedom of having your own space. But soon, the reality of homeownership sets in. A cabinet door starts to sag, a leaky faucet keeps you up at night, or you realize that the perfect spot for your new TV is missing a crucial stud. Suddenly, that feeling of freedom can turn into a sense of being overwhelmed. This is precisely why having the essential power tools for home repair is a game-changer. The right tools can empower you to confidently tackle these common issues yourself, saving you both money and frustration in the long run.
You don’t need to be a professional contractor, but you do need to be a prepared homeowner. The right set of tools, easily found at Winstar Hardware, is the difference between feeling helpless and feeling empowered. Having the ability to tackle minor fixes not only saves you a significant amount of money and time but also gives you a deep sense of pride and accomplishment. This guide is designed to help you build a foundational toolbox—an arsenal of essential power tools for home repair that will allow you to confidently and safely tackle a vast majority of the projects your new home will inevitably throw at you.
We’ll start with the undisputed workhorse of the toolkit, then move on to other specialized tools that make a world of difference. From mastering the basics of drilling and cutting to achieving professional-quality finishes, we will break down why each tool is an investment, what to look for when you’re buying, and how to use it safely and effectively. By the end of this comprehensive guide from the team at Winstar Hardware, you’ll not only know what you need to buy, but you’ll be well on your way to becoming a confident and capable DIY expert, ready to build, fix, and create with confidence.
1. The Cordless Drill/Driver: The Undisputed Workhorse of Your Toolkit
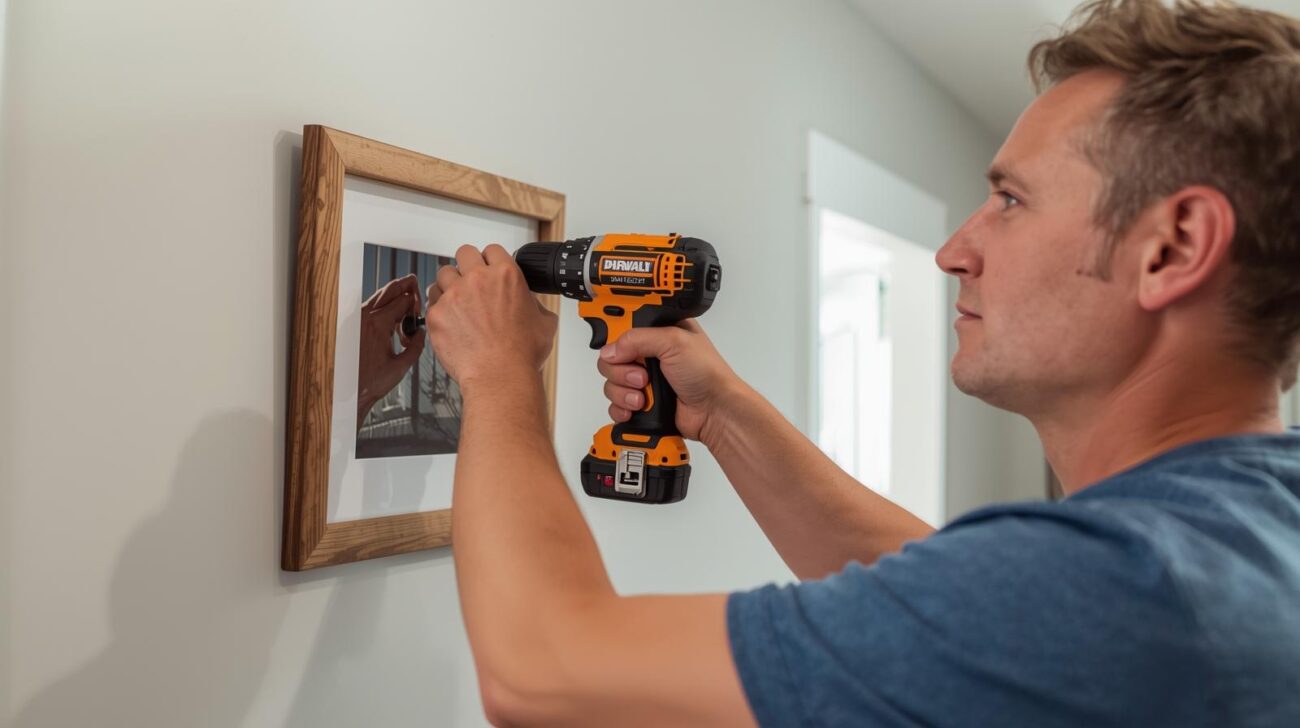
If a home repair kit were a team, the cordless drill/driver would be its most valuable player. It is, without a doubt, the most essential power tool for home repair a new homeowner can own. Its primary function is twofold: it drills holes into wood, drywall, plastic, and even metal, and it drives screws with incredible speed and power, eliminating the wrist strain of a manual screwdriver. This versatility makes it the first tool you’ll reach for on a new project and the one that will see the most use.
Drill vs. Impact Driver: What’s the Difference?
When shopping for a cordless drill , you’ll notice two primary types: the standard drill/driver and the impact driver. While they look similar, their functions are distinct. A standard drill is best for drilling holes and driving screws where precision and control are paramount. Its adjustable clutch prevents you from over-tightening or stripping a screw head. An impact driver, on the other hand, delivers powerful, high-speed rotational bursts (impacts) that make it an unstoppable force for driving long screws or bolts into tough materials without stripping the head. Many homeowners opt for a combo kit that includes both, as they perfectly complement each other. The drill handles delicate work and drilling holes, while the impact driver takes on the heavy-duty fastening jobs.
Key Features to Look For
- Voltage and Power: For most home repair tasks, an 18V or 20V (same thing, different marketing) drill is the perfect choice, offering a great balance of power, weight, and battery life. 12V drills are lighter and more compact, ideal for small, quick jobs.
- Motor Type: Look for a brushless motor if your budget allows. These motors are more efficient, run cooler, and have a longer lifespan than older brushed motors. They are a worthwhile long-term investment.
- Chuck Size: The chuck is the part that holds the drill bit. A 1/2-inch chuck can accommodate a wider range of accessories and is generally more robust than a 3/8-inch chuck, making it the better choice for an all-purpose tool.
- Clutch Settings: This feature, found on standard drills, is a lifesaver. It allows you to set the amount of torque (rotational force) the drill will apply before it starts to slip. This prevents you from driving a screw too far into delicate material like drywall or stripping the head of a screw.
- Projects: Assembling flat-pack furniture, hanging picture frames and mirrors, installing curtain rods, drilling pilot holes for larger screws, and mounting shelves or cabinets.
2. The Circular Saw: For Making Straight and True Cuts
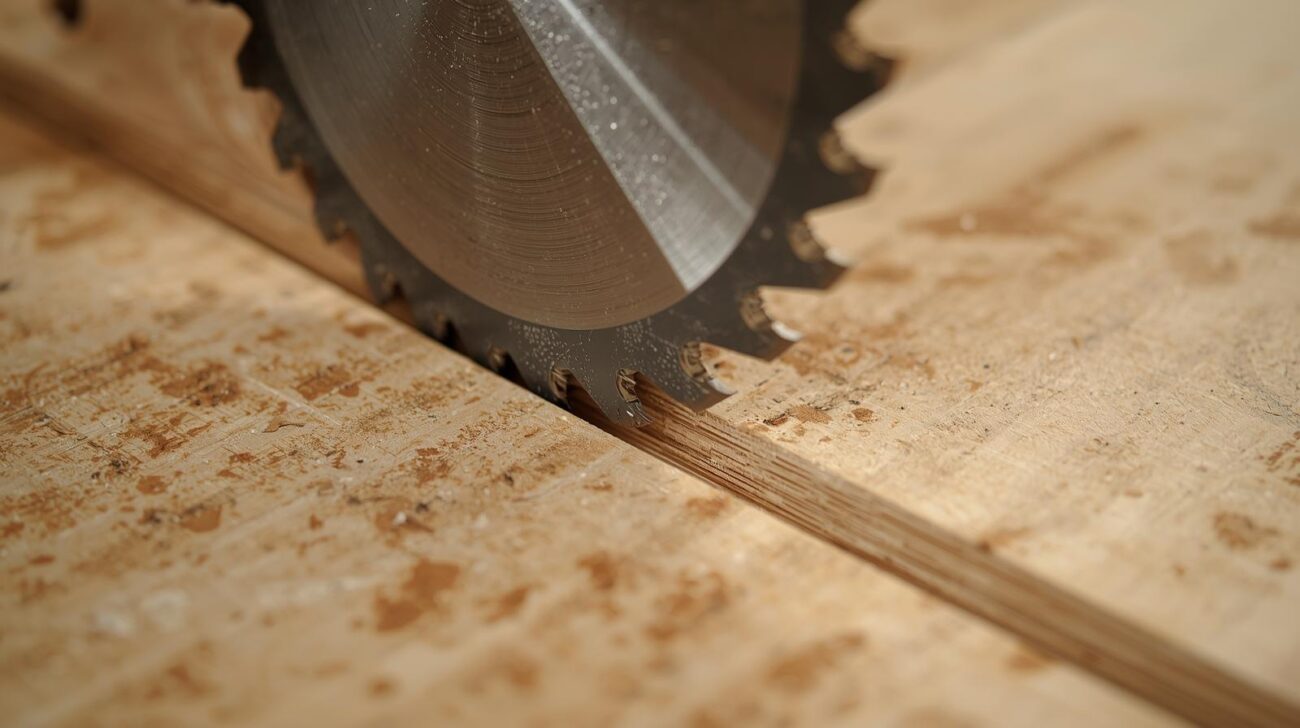
For any home repair project that involves cutting lumber, plywood, or sheets of material, a circular saw is an indispensable tool. It’s the second of the most essential power tools for home repair because it provides a quick and accurate way to make long, straight cuts that would be time-consuming and difficult to achieve with a handsaw. Whether you’re cutting a 2×4 for a new shelf or trimming a piece of plywood for a subfloor, its power and precision make the job far more manageable.
Choosing the Right Blade
The blade is the heart of the saw, and choosing the right one for the job is critical.
- General-Purpose Blade (24-40 teeth): This is the blade that typically comes with the saw. It’s a great all-around choice for a variety of cuts, from rough framing to general carpentry.
- Plywood Blade (60+ teeth): For a clean, smooth cut in plywood or other sheet goods where you want to minimize splintering, a blade with more teeth is the way to go.
- Framing Blade (18-24 teeth): This blade is designed for rough, fast cuts in dimensional lumber, like 2x4s and 2x6s.
Safety First
A circular saw is a powerful tool, and safety must always be your top priority. Ensure the saw has a functional blade guard, and always use both hands to guide the saw. An electric brake, a feature on many modern saws, stops the blade almost instantly when you release the trigger, adding a crucial layer of safety.
- Projects: Cutting lumber to build a workbench, sizing sheets of plywood for projects, building a simple deck, making a quick cut for a fence repair, or trimming down a door.
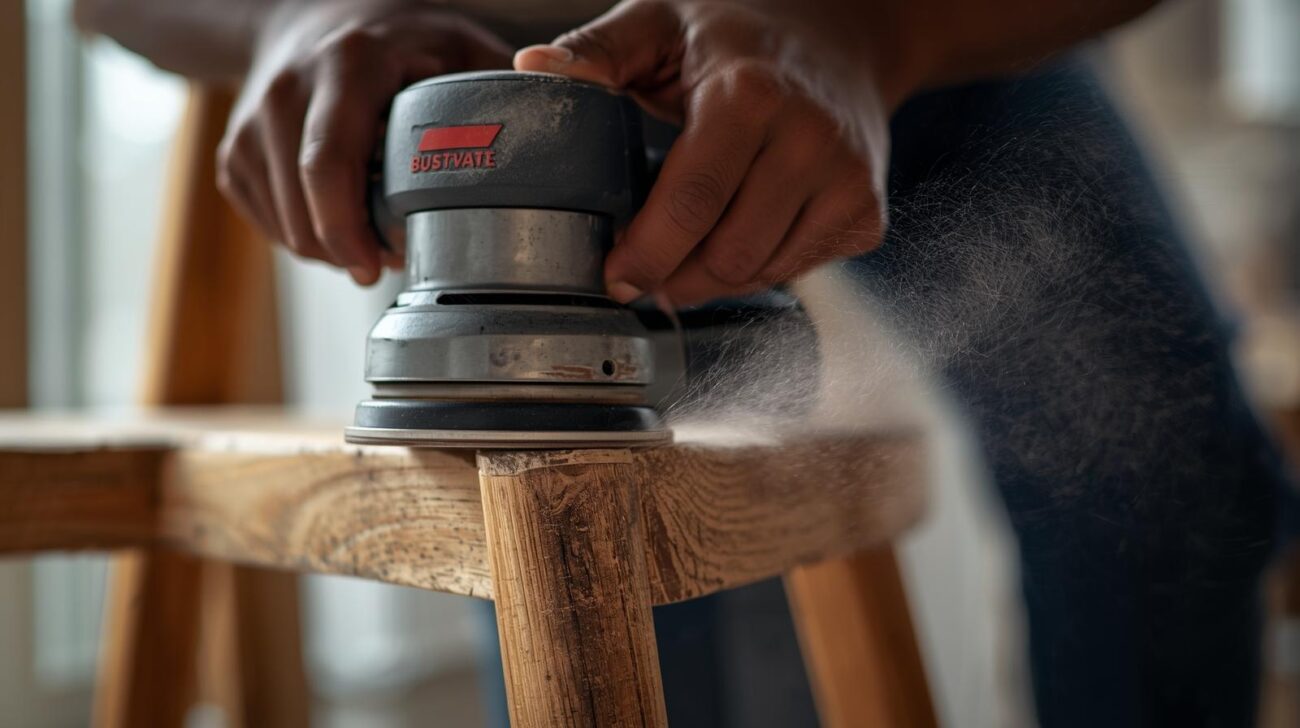
3. The Random Orbital Sander: For a Flawless Finish
Sanding is the foundation of any good painting or staining project, but doing it by hand can be tedious and back-breaking. The random orbital sander is a game-changer and a surprisingly essential power tool for home repair. Unlike a regular sander that moves in a fixed pattern, this one moves in a “random orbit”—a combination of spinning and vibrating motions. This unique action ensures there are no visible swirl marks, leaving you with a smooth, professional-looking finish every time.
Understanding Sandpaper Grits
The grit of the sandpaper you use is determined by the task. It’s a good practice to have a variety of grits on hand.
- Coarse (60-80 grit): Use this for aggressive material removal, such as stripping old paint or varnish from a surface.
- Medium (100-120 grit): Ideal for general sanding and smoothing. It’s the most common grit you’ll use.
- Fine (150-220 grit): Use this for the final pass before applying a stain or a topcoat. It creates a silky-smooth surface.
Features and Projects
Look for a sander with an effective dust collection system, either a built-in bag or a port to connect to a shop vacuum. This not only keeps your workspace cleaner but also makes for a better finish. Variable speed control is another great feature, allowing you to slow down the sanding for more delicate work.
- Projects: Refinishing an old wooden table or chair, smoothing out patched drywall, preparing a surface for a fresh coat of paint, or removing rust from metal.
4. The Jigsaw: For Intricate Cuts and Shapes
While a circular saw is king for straight lines, the jigsaw is the undisputed champion of curves and intricate shapes. It is an essential power tool for home repair when a project requires precision for non-linear cuts, making it the perfect tool for creative projects and tricky fixes. Its reciprocating blade allows it to cut tight curves and corners in wood, plastic, and even metal.
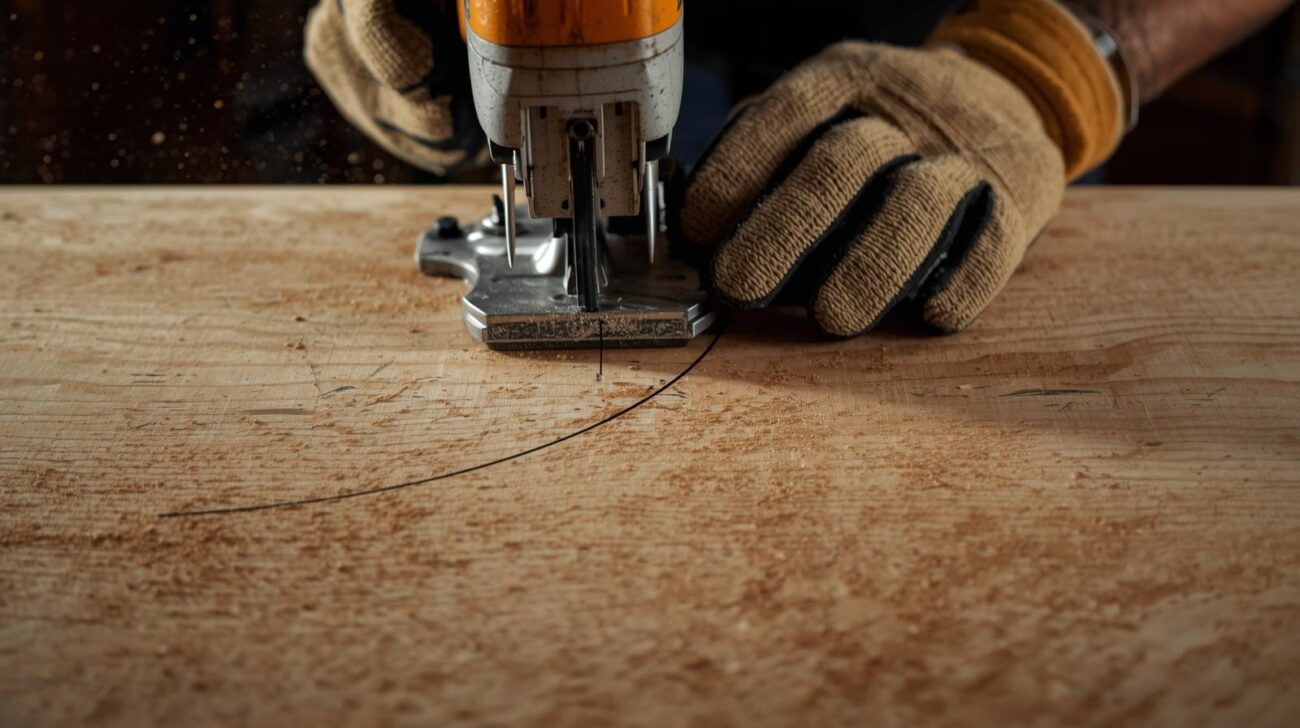
Blade Selection Matters
The key to a jigsaw’s versatility lies in its blades. They are material-specific and come in a variety of styles.
- Wood Blades: Coarse-toothed blades are for fast, rough cuts. Fine-toothed blades are for smoother, more precise cuts, and “scroll” blades are extra thin for very tight curves.
- Metal Blades: These have fine teeth for cutting through thin metals like aluminum and sheet steel.
- Specialty Blades: There are also blades designed for cutting ceramic tile, plastic, and other materials.
Tips for Use
Always let the tool do the work—don’t force it, as this can break the blade or damage the material. For the cleanest cut, use a higher speed for softer materials and a slower speed for harder ones.
- Projects: Cutting a custom hole in a countertop for a new sink, creating decorative shapes for a craft project, cutting a hole in drywall for an electrical outlet, or trimming a piece of wood with a unique curve.
5. The Oscillating Multi-Tool: The Swiss Army Knife of DIY
The oscillating multi-tool may not be as well-known as a drill, but its problem-solving abilities make it a uniquely essential power tool for home repair. It’s the ultimate jack-of-all-trades, capable of sanding, cutting, scraping, and grinding with a simple change of attachment. The rapid, side-to-side oscillation of the blade or pad makes it perfect for getting into tight spaces that no other tool can reach.
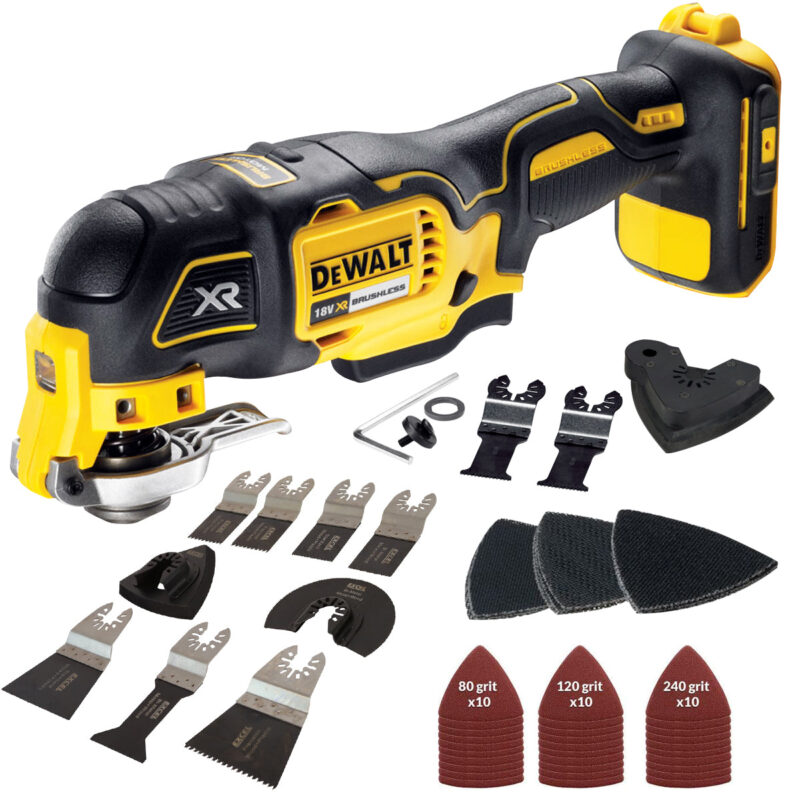
Attachments Are Everything
The tool’s power is in its accessories. You can buy kits with a variety of blades, each designed for a different task.
- Cutting Blades: Used for making plunge cuts in drywall to install an electrical box, cutting trim, or sawing through a piece of PVC pipe in a tight spot.
- Scraping Blades: Ideal for removing old caulk, lifting old flooring adhesive, or scraping paint off a window pane.
- Sanding Pads: For sanding in tight corners or on detailed surfaces.
- Grout Removal Blades: Specifically designed to grind away old grout between tiles.
The Ultimate Problem-Solver
This tool excels at jobs where other tools would cause damage or are simply too big to fit. It’s the perfect tool for when you need to make a small, precise cut or scrape without affecting the surrounding area.
- Projects: Removing old grout from a bathroom floor, cutting a nail flush with a surface, trimming a piece of baseboard without removing it, or cutting a precise hole in drywall for a new light fixture.
Other Essential Power Tools for a Well-Equipped Home
While the five tools we’ve covered are the foundational building blocks of any home repair kit, there are a handful of other powerful tools that will significantly expand your capabilities. These are not just nice-to-haves; for the right jobs, they are truly essential power tools for home repair that can turn a difficult or messy task into a manageable one.
The Other Power Sanders: For Specialized Finishes
As great as the random orbital sander is for general smoothing, some jobs require a different kind of power.
- The Belt Sander: This is a brute-force sander designed for aggressive material removal. It uses a continuous loop of sandpaper on two rotating drums to quickly level uneven surfaces, strip old paint from a door or deck, or shape wood. It’s too powerful for fine finishing but is invaluable for getting a project from rough to ready in record time. Check out this video by Ace Hardware for a visual guide on how to use a belt sander.
- The Detail Sander (Mouse Sander): On the opposite end of the spectrum, the detail sander is the tool for sanding in tight corners, intricate trim, and other hard-to-reach spots. Its small, triangular-shaped pad is designed to fit where no other sander can, making it perfect for furniture refinishing or smoothing small repairs. This video shows how to use a detail sander.
The Power Washer: A Must-Have for Outdoor Maintenance
While not a repair tool in the traditional sense, a power washer is one of the most transformative essential power tools for home repair and maintenance. It uses a high-pressure stream of water to blast away years of dirt, grime, mold, and mildew from various outdoor surfaces. It’s an invaluable tool for maintaining your home’s curb appeal and preparing surfaces for other projects.

You can use a power washer to:
- Clean decks and patios before restaining.
- Wash the siding of your home to make it look new again.
- Deep clean driveways and walkways to remove stubborn oil stains and dirt.
- Restore the look of your outdoor furniture, fences, and brickwork.
Power washers come in two main types: electric and gas-powered. Electric models are lighter and quieter, perfect for smaller jobs and residential use. Gas models are more powerful, making them ideal for large areas or commercial tasks. Regardless of the type, always wear safety glasses and be mindful of the powerful water stream.
The Shop-Vac: Your Clean-Up Crew
No list of essential power tools for home repair is complete without a plan for cleanup. A regular household vacuum is no match for the messes a DIY project creates—sawdust, drywall dust, nails, screws, and even liquids. A shop-vac (or wet/dry vacuum) is a heavy-duty vacuum built specifically to handle these challenges.
Its powerful motor and robust construction allow it to effortlessly suck up:
- Large piles of sawdust after cutting lumber.
- Wood chips, screws, and other small debris from the floor of a workshop or garage.
- Water from a clogged sink or a minor plumbing leak.
- Drywall dust, which can clog and destroy a regular vacuum.
Many power tools, like sanders and saws, have dust ports that can be connected to a shop-vac, capturing debris as you work and keeping your air and workspace clean. It’s an investment that pays for itself in convenience and in the longevity of your other tools.
The Compound Miter Saw: For Perfect Angles and Precision
If you’ve ever tried to cut a piece of trim or molding with a circular saw, you know how difficult it is to get a perfect 45-degree angle. This is where the compound miter saw shines. It’s a specialized saw designed to make perfect, repeatable cuts at a variety of angles. For a new homeowner who wants to take their projects to the next level—from picture frames to baseboards—this is an invaluable upgrade.
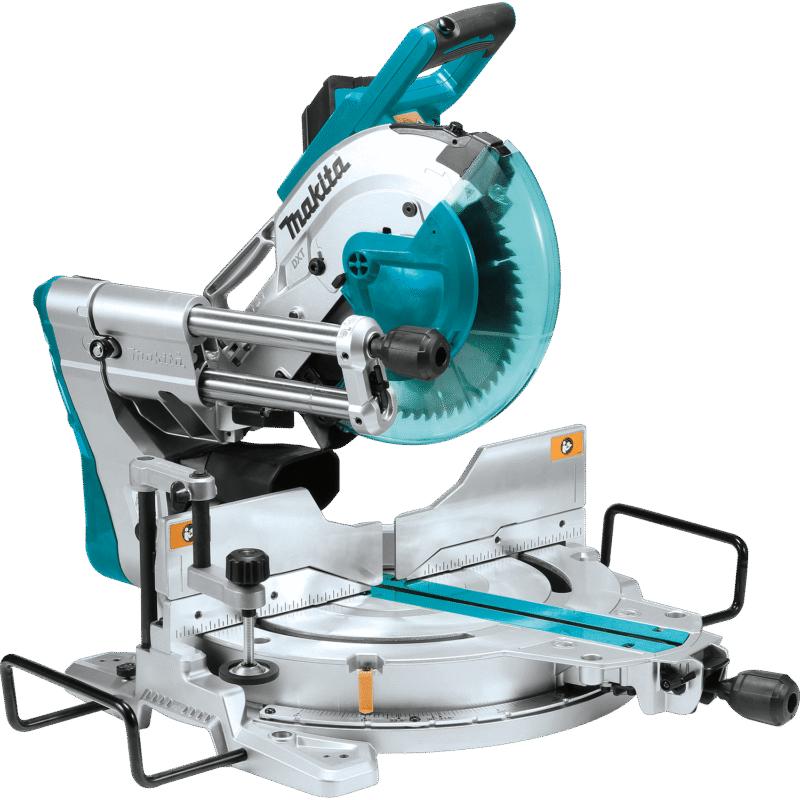
A compound miter saw can make three types of cuts:
- Crosscuts: A straight, 90-degree cut across the width of the board.
- Miter Cuts: Angled cuts (like 45 degrees) for forming corners, essential for trim and molding.
- Bevel Cuts: Angled cuts on the edge of the board, allowing you to create more complex joints.
A sliding compound miter saw is an even more versatile version that can move forward and backward on rails, allowing you to cut wider boards. While it may seem like a luxury, this tool is one of the most satisfying essential power tools for home repair because it guarantees a clean, professional finish on any project that requires precise cuts.
Safety First: A Comprehensive Guide to Power Tool Safety
You’ve built your collection of essential power tools for home repair, and you’re ready to get started. But before you make that first cut or drive that first screw, it is absolutely critical to understand that the most important tool you have is your own judgment. Power tools are designed to make difficult tasks easy, but their power can also be dangerous if not treated with the utmost respect. This section is not a suggestion—it is a non-negotiable guide to keeping yourself and those around you safe.
1. The Golden Rule: Wear Your Personal Protective Equipment (PPE)
Think of PPE as your personal force field. It’s an easy, low-cost way to prevent serious injury. Never, ever operate a power tool without these three items:
- Safety Glasses or Goggles: Sawdust, wood chips, and stray metal fragments can become high-speed projectiles. Your eyes are irreplaceable. Standard eyeglasses are not enough; always wear ANSI-approved safety glasses with side shields or goggles.
- Hearing Protection: The continuous, high-decibel noise from saws and drills can cause permanent hearing damage over time. This damage is silent and cumulative. Wear a good pair of noise-reducing earmuffs or high-quality foam earplugs.
- Dust Mask or Respirator: Sawing, sanding, and drilling create fine dust particles that can irritate your lungs and cause long-term respiratory problems. A simple dust mask is a good start, but a respirator is a better option for prolonged work with materials like drywall or MDF.
2. Before You Plug It In: A Pre-Operation Checklist
Your safety begins before you even press the power button. A quick check can prevent a major accident.
- Read the Manual: Every tool is different. The manufacturer’s manual contains specific safety instructions, maintenance tips, and warnings that are unique to your model. Take a few minutes to read it.
- Inspect Your Tool: Check the cord for any fraying or damage. Ensure all guards, fences, and safety features are in place and working properly. Never use a tool that shows any signs of damage.
- Clear Your Workspace: A cluttered space is an accident waiting to happen. Clear the area of any cords, scraps, or tools that could cause you to trip or slip.
- Secure Your Workpiece: Never hold a piece of material by hand while cutting or drilling. Use clamps or a vise to secure the material firmly to a workbench. This prevents the workpiece from shifting or “kicking back” toward you, a common cause of serious injury.
- Dress for the Job: Avoid loose-fitting clothes, dangling drawstrings, jewelry, or anything that could get caught in a spinning blade or bit. Tie back long hair and consider wearing short sleeves or a tight-fitting jacket.
3. During Operation: Focus and Control
Once the tool is on, your full attention is required.
- Stay Focused and Alert: Do not operate power tools when you are tired, under the influence of alcohol, or distracted by your phone or other people. Your focus is the most important safety feature.
- Let the Tool Do the Work: Do not force a tool through the material. A smooth, steady motion is all that’s required. Forcing a saw can cause it to bind and kick back, and forcing a drill can damage the bit and the motor.
- Use All Safety Features: Never remove a blade guard from a saw or bypass a safety lock. They are there for a reason and are designed to protect you in case of a slip or a mistake.
- Change Bits and Blades Safely: Always unplug the tool or remove the battery before changing a bit, blade, or accessory. This simple step prevents an accidental start that could lead to a severe cut.
4. After the Job: Proper Storage
Your job isn’t done until the tools are safely stored.
- Clean your tools, unplug them, and store them in their cases or a secure location.
- Keep all power tools out of the reach of children.
Your ability to confidently use these essential power tools for home repair is a source of pride. By committing to these safety practices, you ensure that you can continue to enjoy the satisfaction of homeownership and DIY for years to come.
A Detailed Shopping Guide for New Homeowners
Choosing the right essential power tools for home repair can feel overwhelming. With so many brands, battery types, and motor technologies, where do you even begin? This guide, brought to you by Winstar Hardware, will help you make a smart, informed decision that fits your budget and your needs.
Brushed vs. Brushless Motors: What’s the Difference?
This is one of the most important factors in a tool’s performance and price.
- Brushed Motors: These are the traditional motors that have been used for decades. They contain carbon “brushes” that physically make contact to transfer electricity to the motor, creating friction, heat, and noise.
- Pros: They are much more affordable to manufacture, making tools with these motors the go-to for budget-conscious buyers and casual DIYers.
- Cons: Less efficient, have a shorter lifespan due to the brushes wearing out, and run hotter, which can drain a battery faster. They also tend to have less power and torque.
- Brushless Motors: A newer, more advanced technology that uses an electronic circuit board to transfer electricity to the motor. There is no physical contact, which eliminates friction and heat.
- Pros: Significantly more efficient, resulting in longer run times and more power from the same battery. They are also quieter, have a much longer lifespan, and require virtually no maintenance.
- Cons: Higher initial cost due to the more complex electronics.
Recommendation: For an occasional DIYer or a new homeowner on a tight budget, a brushed tool is perfectly sufficient. However, if you plan to use your tools for frequent or more demanding projects, the investment in a brushless tool is well worth the extra cost for its superior performance and longevity.
The Power of the Battery Platform
When buying cordless tools, you’re not just buying a single tool—you’re investing in a battery platform or “ecosystem.” The major brands design their batteries to be compatible with a wide range of their tools. This is a crucial concept.
- Pros: Once you buy a starter kit with a battery and charger, you can purchase additional “bare tools” (tools without a battery) at a much lower cost. This allows you to build a comprehensive toolkit without having to buy a new battery and charger for every single tool. It also simplifies your life by having one type of battery and charger to worry about.
- Cons: You are locked into a single brand. While some third-party battery adapters exist, they can be unreliable and may void your tool’s warranty.
Recommendation: Before you buy your first cordless tool, research a brand’s entire product line. Choose a brand with a wide array of tools that you might need in the future, from drills to saws and even outdoor equipment.
Brand Recommendations for Every Homeowner
Choosing a brand often comes down to balancing budget, tool selection, and desired performance. Here is a breakdown of some of the most popular brands on the market, categorized by user type.
Best for the Budget-Conscious DIYer
- Ryobi: Ryobi is the undisputed king of the homeowner market. Their tools are affordable, reliable, and sold through major retailers like The Home Depot, making them easy to find. The Ryobi ONE+ 18V battery platform is a standout, with over 280 compatible tools, from drills to air compressors and lawnmowers. For a new homeowner just starting their kit, Ryobi offers the best balance of value and versatility.
- Craftsman: A trusted name with a long history, Craftsman offers durable and reliable tools at competitive prices. Their V20 battery platform provides a solid and affordable entry point into the world of cordless tools.
Best for the Aspiring DIYer & Prosumer
- DeWalt: Instantly recognizable by their black and yellow color scheme, DeWalt is a favorite among professionals and serious DIYers. They offer a great mix of power, durability, and a massive ecosystem of tools. Their 20V MAX and FLEXVOLT (which can switch between 20V and 60V) platforms are known for their reliability and power.
- Milwaukee: Milwaukee is another top-tier brand known for its innovation and performance. They are particularly praised for their powerful impact drivers and extensive range of specialized tools. Their M12 (for compact tools) and M18 (for power-hungry tools) battery platforms are industry leaders.
- Makita: A major player with a reputation for superior quality, ergonomics, and innovative designs. Makita tools are often lighter and more comfortable to use for long periods. Their 18V LXT and 40V max XGT platforms are a testament to their commitment to powerful, reliable tools for professionals and homeowners alike.
Beyond the Basics: Advanced Tools for the Serious DIYer
By now, you’ve assembled a fantastic collection of essential power tools for home repair. You’re confident with your drill, your saw, and your sander. You’ve tackled the basic fixes and are now looking at more ambitious projects—building custom furniture, installing intricate trim, or creating something from scratch. These projects require a higher level of precision and specialization. Here are a few advanced tools to consider once you’re ready to take your DIY skills to the next level.
The Table Saw: For Unmatched Precision in Ripping
If the circular saw is the workhorse of rough cuts, the table saw is the king of precision. Its primary purpose is to make long, straight cuts, known as “rips,” on large sheets of wood or lumber with a level of accuracy that a handheld saw cannot match. A table saw is an invaluable tool for building cabinets, bookshelves, or cutting down sheets of plywood for new flooring.
- Why it’s a step up: The table saw’s sturdy fence and flat table provide a consistent guide, ensuring every cut is perfectly straight. This precision is essential for creating tight joints and flawless-looking projects.
- Safety is paramount: The table saw is one of the most powerful and potentially dangerous tools in a workshop. It is non-negotiable to always use the blade guard, the fence, and, most importantly, a push stick to keep your hands far away from the blade.
The Router: For Decorative Edges and Custom Joinery
A router is a specialized tool that uses a fast-spinning bit to hollow out or shape the edge of a piece of wood. With a variety of interchangeable bits, it’s the go-to tool for adding a professional, finished look to your projects.
- Why it’s a step up: A router allows you to create decorative edges on shelves, tabletops, or trim. It can also be used to cut grooves (dadoes and rabbets) for strong, professional-grade wood joints in cabinetry and furniture. It’s the tool that elevates a simple project into a piece of craftsmanship.
- Types: A fixed-base router is excellent for edge work, while a plunge router is ideal for making cuts in the middle of a piece, like for a sign or a recessed handle.
The Brad Nailer (or Finish Nailer): For Flawless Fastening
While a hammer and nails are a must-have, a power nailer takes the stress and guesswork out of delicate fastening. A brad nailer uses compressed air or an internal battery to fire tiny, headless nails, known as brads. This tool is a lifesaver for installing trim, molding, and thin pieces of wood quickly and cleanly.
- Why it’s a step up: It eliminates the risk of bending a nail or denting your finished work with an errant hammer strike. The brads leave a tiny, almost invisible hole that can be filled with wood putty in seconds, creating a flawless finish.
- Types: Brad nailers fire smaller, less visible nails and are perfect for delicate trim. Finish nailers fire larger nails and are better for more structural applications, like attaching baseboards.
Conclusion: Go Forth and Build
Congratulations, you are now equipped with the knowledge to build a toolkit that will empower you to tackle any number of home projects. From the simple act of hanging a picture frame to more ambitious endeavors like building a custom bookcase, the right set of tools, available at Winstar Hardware, is the key to turning a daunting task into a satisfying achievement. We have covered the foundational workhorses, the specialized problem-solvers, and the advanced tools that will take your skills to the next level.
Remember, the journey of homeownership is not about being perfect, but about being prepared. By investing in these essential power tools for home repair, you are not just buying a collection of objects—you are investing in your own confidence, your home’s longevity, and your ability to solve problems on your own terms. Start with the basics, always prioritize safety, and never underestimate the satisfaction of stepping back and admiring something you fixed or built yourself.
So, go ahead and make that first purchase. Turn a wrench, drive a screw, or make that first cut. Your home is waiting for you to make it truly your own.