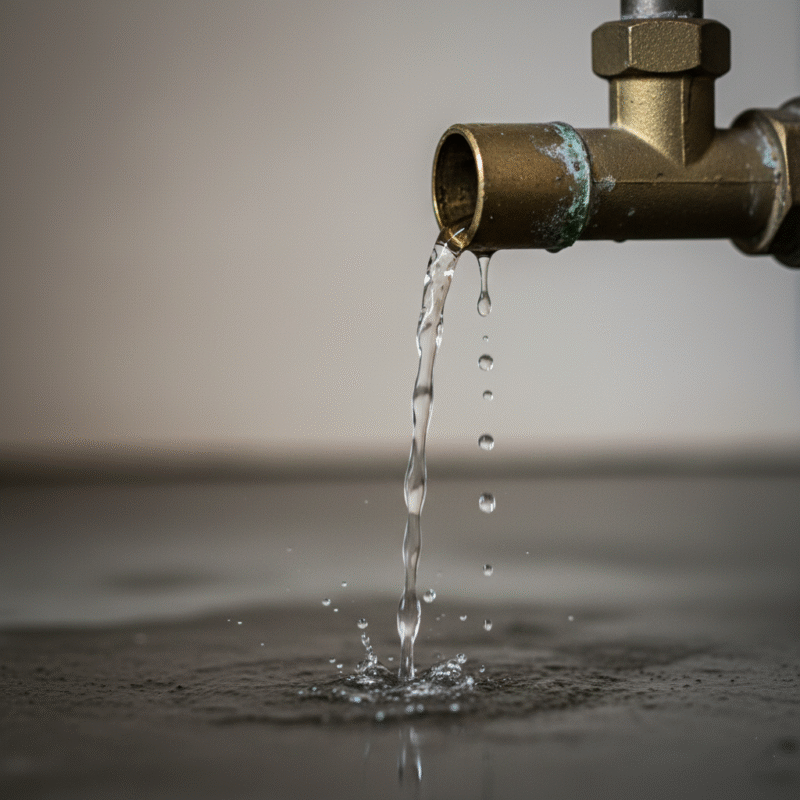
The gentle drip-drip-drip from your toilet cistern might seem like a minor annoyance, but in a country like Kenya, where water conservation is paramount and water bills can quickly add up, a cistern leaking is more than just a nuisance – it’s a drain on your resources and the environment. Whether you’re in a bustling city like Nairobi, a coastal town like Mombasa, or a rural area, efficient water management is crucial. At Winstar Hardware, we understand the challenges Kenyan homeowners and businesses face, and that’s why we’re here to help you identify why your cistern leaking and equip you with the knowledge for simple, effective DIY fixes.
Don’t let a cistern leaking turn into a major headache or an extravagant water bill. Often, the culprits are minor and easily fixable with a few tools and quality parts you can find right here at Winstar Hardware. Let’s dive into the most common reasons behind a cistern leaking and how you can tackle them head-on.
The Hidden Cost of a Leaky Cistern in Kenya
Before we get to the fixes, it’s important to understand the impact. A continuously cistern leaking can waste thousands of litres of water annually. For a typical Kenyan household, this translates to:
- Higher Water Bills: Every drop wasted is money down the drain. Nairobi Water, Mombasa Water, and other utility companies charge for every litre, and a persistent leak can make your bill skyrocket.
- Water Scarcity Issues: Kenya frequently experiences water rationing and scarcity, particularly during dry seasons. Wasting water, even unintentionally, exacerbates this national challenge.
- Damage to Property: While less common for internal cistern leaks, persistent dampness can lead to mould, mildew, and structural damage over time, especially in older buildings or those with poor ventilation.
- Environmental Impact: Water is a precious resource. Conserving it helps maintain ecological balance and supports sustainable living.
Knowing the significance of fixing a cistern leaking quickly underscores the importance of the DIY solutions we’ll discuss.
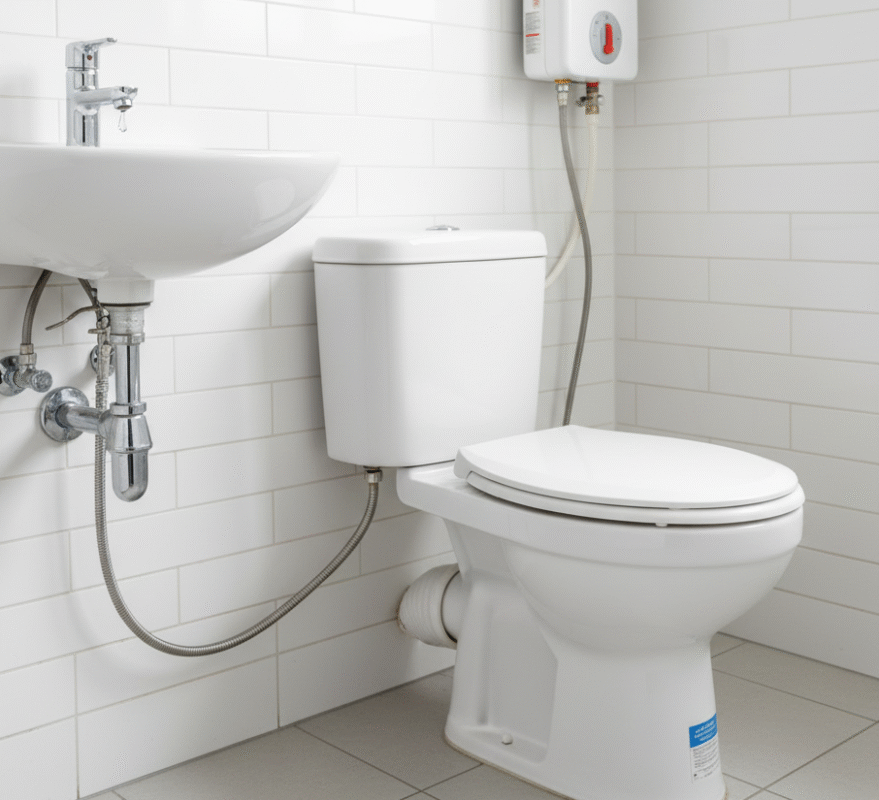
Understanding Your Cistern: Key Components
To fix a cistern leaking, it helps to know what’s inside. A standard toilet cistern typically has a few main components:
- Inlet Valve (Fill Valve): This controls the flow of water into the cistern from your main supply after flushing. It’s often the source of an cistern leaking where water continuously runs into the bowl.
- Outlet Valve (Flush Valve): This component holds the water in the cistern until you flush. When you press the handle, it lifts a flapper or diaphragm, allowing water to rush into the toilet bowl. A faulty flush valve is a very common cause of a cistern leaking directly into the bowl.
- Flapper/Diaphragm/Syphon: This is the seal at the bottom of the cistern that prevents water from flowing into the toilet bowl when not flushing. It’s part of the outlet valve mechanism.
- Float Arm/Cup: Connected to the inlet valve, this mechanism rises with the water level. Once the water reaches the desired level, the float triggers the inlet valve to shut off the water supply.
- Overflow Pipe: This vertical pipe prevents the cistern from overflowing onto your bathroom floor if the inlet valve fails to shut off. Instead, excess water flows harmlessly into the toilet bowl.
Knowing these parts will make diagnosing and fixing your cistern leaking much easier.
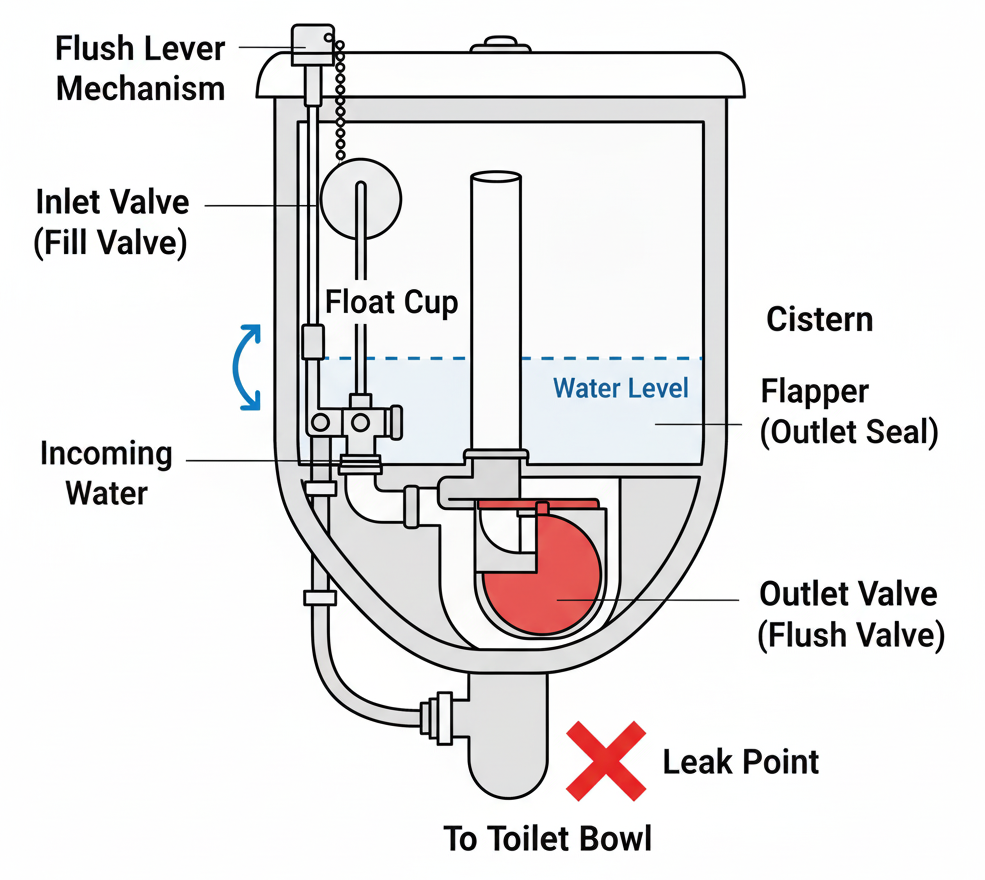
Diagram 2: A labelled diagram of a toilet cistern showing the inlet valve, outlet valve (with flapper/syphon), float, and overflow pipe. This could be a technical drawing or a simplified illustrative cross-section. (Similar to the P-trap diagram, but for a cistern). Alternative Text Suggestion: “A labelled diagram illustrating the internal components of a toilet cistern, including the fill valve, flush valve, float, and overflow pipe.”
Common Causes of a Cistern Leaking and How to Identify Them
Let’s get down to the brass tacks. Here are the most frequent reasons you might find your cistern leaking:
Faulty Flapper or Syphon Seal
This is arguably the most common reason for a cistern leaking directly into the toilet bowl. The flapper (a rubber or plastic seal) or syphon diaphragm at the bottom of the cistern degrades over time. Hard water, common in many parts of Kenya, can cause mineral buildup, and the chlorine in treated water can make rubber components brittle.
How to Identify:
- The Dye Test: Add a few drops of food colouring (or even a teabag) to the cistern water. Do not flush for at least 15-20 minutes. If you see the coloured water appearing in the toilet bowl, your flapper or syphon seal is compromised, and your cistern leaking into the bowl.
- Visual Inspection: If you look into the cistern, can you see a trickle of water going down into the bowl even when it’s not flushed?
DIY Fix: Replacing the Flapper/Syphon
- Turn off the Water Supply: Locate the stopcock (angle valve) behind or next to your toilet and turn it clockwise until the water stops flowing.
- Flush the Toilet: This empties the cistern.
- Remove the Old Flapper/Syphon: Disconnect the chain from the flush lever. Unclip or unhook the old flapper from the overflow pipe. If it’s a syphon, you might need to twist and lift the entire unit out.
- Clean the Sealing Surface: Use a cloth to clean any mineral deposits or grime from the rim where the flapper/syphon sits. This ensures a tight new seal.
- Install the New Flapper/Syphon: Attach the new flapper by clipping it onto the overflow pipe. Ensure it sits squarely over the opening. Reconnect the chain, leaving a little slack (about 1-2 links) so it doesn’t prevent the flapper from sealing properly. For a syphon, reinsert and twist to lock.
- Turn On Water and Test: Slowly open the stopcock and let the cistern refill. Perform the dye test again to confirm the cistern leaking has stopped.
Winstar Hardware Tip: We stock a wide range of durable flappers and syphon repair kits suitable for various cistern models common in Kenya. Always bring your old part or a photo to ensure you get the right replacement.
Faulty Inlet Valve (Fill Valve)
If your cistern leaking involves water continuously running into the overflow pipe or directly into the bowl (even after the cistern has filled), the inlet valve is likely the culprit. This happens when the valve mechanism fails to shut off the water supply once the float reaches its set level.
How to Identify:
- Listen: Can you hear a constant hissing or trickling sound even when the toilet hasn’t been flushed recently?
- Visual Inspection (Overflow): Look into the cistern. If the water level is above the overflow pipe, or if water is visibly flowing into the overflow pipe, the inlet valve is not shutting off.
- Visual Inspection (Bowl): If water isn’t overflowing but you still hear a constant trickle into the bowl, it could be the inlet valve allowing water past the flapper and into the bowl simultaneously, or the float simply isn’t rising high enough to fully engage the shut-off.
DIY Fix: Adjusting or Replacing the Inlet Valve
Adjusting the Float:
- Float Arm: If you have an older-style float ball on an arm, gently bend the float arm downwards slightly. This will make the float reach the shut-off point earlier.
- Float Cup: Most modern cisterns in Kenya use a float cup that slides up and down a vertical shaft. There’s usually a screw or clip mechanism to adjust its height. Lower the float cup by turning the screw counter-clockwise or adjusting the clip.
- After adjustment, let the cistern refill and check if the water stops at the correct level (usually about an inch below the top of the overflow pipe). If the cistern leaking continues, proceed to replacement.
Replacing the Inlet Valve (Fill Valve):
- Turn Off Water Supply and Empty Cistern: As before, turn off the stopcock and flush the toilet. You might need to use a sponge or old cloth to remove any remaining water.
- Disconnect the Water Supply Line: Using a spanner, disconnect the flexible water supply pipe from the bottom of the inlet valve (underneath the cistern). Be prepared for a small amount of residual water.
- Remove the Old Inlet Valve: Loosen the large plastic nut that secures the inlet valve to the bottom of the cistern. Carefully lift the old valve out.
- Install the New Inlet Valve: Insert the new inlet valve into the hole from inside the cistern, ensuring the washer is correctly seated. From underneath, tighten the securing nut by hand, then a quarter turn with a spanner (don’t overtighten!).
- Reconnect Water Supply Line: Attach the flexible supply pipe to the new inlet valve, again hand-tightening first, then a quarter turn with a spanner.
- Adjust Float and Test: Turn the water supply back on. Once the cistern fills, adjust the float mechanism as described above to ensure the water level is correct and the valve shuts off completely. Check for any leaks around the connections and perform the dye test again if unsure about leaks into the bowl.
Winstar Hardware Tip: Our friendly staff can guide you through selecting the right universal inlet valve for your cistern. Look for models designed to handle varying water pressures, common in different Kenyan regions.
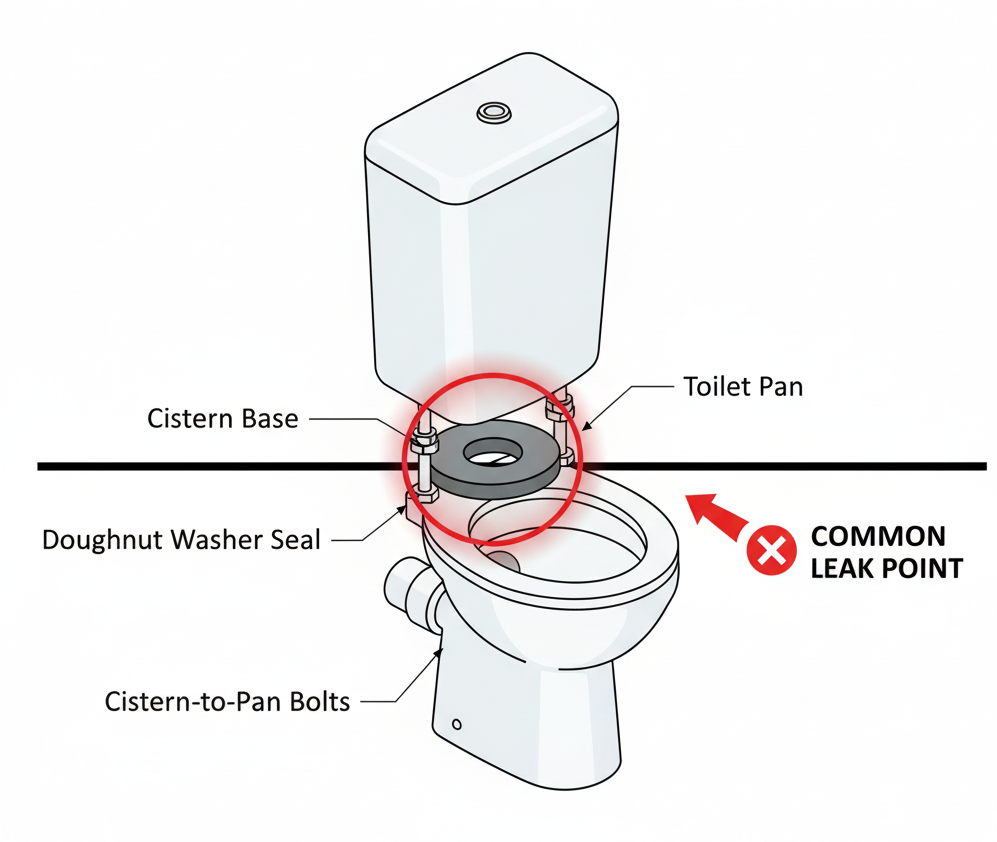
Worn Out Doughnut Washer (Close-Coupled Toilets)
Many toilets in Kenya are “close-coupled,” meaning the cistern sits directly on top of the toilet pan. Between the cistern and the pan, there’s a large rubber washer, often shaped like a doughnut. If this washer degrades, water can leak from the bottom of the cistern onto the floor (or into the pan connection, which can be confusing). This type of cistern leaking is often more noticeable as puddles on the bathroom floor.
How to Identify:
- Puddles on the Floor: If you see water accumulating on the floor directly beneath the joint where the cistern meets the pan, this is a strong indicator.
- Feel for Dampness: Run your hand around the base of the cistern where it meets the pan. You might feel dampness.
- Tissue Test: Place a dry tissue or piece of toilet paper around the base. If it gets wet, you’ve found your leak source.
DIY Fix: Replacing the Doughnut Washer
This is a more involved fix as it requires removing the cistern from the pan.
- Turn Off Water Supply and Empty Cistern: Turn off the stopcock and flush the toilet until the cistern is empty.
- Disconnect the Water Supply Line: Disconnect the flexible pipe from the inlet valve underneath the cistern.
- Disconnect Flush Lever (if external): If your flush handle connects to the outlet valve internally, you might need to unhook it.
- Unbolt the Cistern from the Pan: There are usually two large bolts that pass from the inside of the cistern, through the doughnut washer, and secure it to the toilet pan. Use a screwdriver (from inside the cistern) and a spanner (underneath the pan) to loosen and remove these bolts.
- Carefully Lift the Cistern: With the bolts removed, gently lift the cistern straight up and off the pan. Place it on a protected surface.
- Remove Old Doughnut Washer: The old, degraded washer will be visible. Remove it and clean the sealing surfaces on both the cistern and the pan thoroughly.
- Install the New Doughnut Washer: Place the new doughnut washer onto the outlet pipe at the bottom of the cistern. Ensure it sits flush and covers the opening properly.
- Re-seat the Cistern: Carefully lower the cistern back onto the pan, aligning the bolt holes and the outlet pipe with the corresponding openings in the pan.
- Re-install Bolts: Insert the new cistern-to-pan bolts (often included with new washers) from inside the cistern, through the washer, and out the bottom. Attach the rubber and metal washers, then the nuts, and tighten them evenly with a spanner. Do not overtighten! Overtightening can crack the ceramic. Tighten one side a little, then the other, alternating until secure and stable.
- Reconnect Water Supply and Test: Reconnect the flexible supply pipe. Turn the water supply back on and let the cistern refill. Check carefully for any signs of a cistern leaking from the base.
Winstar Hardware Tip: We stock universal doughnut washers and cistern bolt kits. Replacing the bolts along with the washer is highly recommended for a secure, leak-free seal.
Cracked Cistern or Plumbing
While less common, a physical crack in the ceramic cistern itself or in the connecting pipes can definitely lead to a cistern leaking. This can happen due to impact, extreme temperature changes (though less common in Kenya’s relatively stable climate compared to temperate regions), or manufacturing defects.
How to Identify:
- Visual Inspection: Thoroughly inspect the exterior and interior of the cistern for any hairline cracks or chips, especially after cleaning or during maintenance.
- Damp Spots: Look for persistent damp spots on the exterior of the cistern or directly underneath it that aren’t explained by other leaks.
- Connecting Pipes: Check the flexible water supply pipe and any other connections for visible damage, kinks, or drips.
DIY Fix: Temporary Patch or Replacement
- For Minor Hairline Cracks (Temporary): Some minor, non-structural hairline cracks can be temporarily sealed with specialized waterproof epoxy putty or sealant designed for ceramic. Clean and dry the area thoroughly before application. This is a temporary measure, and replacement is the long-term solution.
- For Major Cracks or Pipe Damage: If you find a significant crack in the cistern or a damaged connecting pipe, the most reliable long-term solution is replacement.
- Replacing a Flexible Pipe: This is a straightforward process: turn off the water, disconnect the old pipe, and connect a new one (ensure you have the correct thread sizes and washers).
- Replacing the Cistern: This is a bigger job, requiring the complete removal of the old cistern and installation of a new one, as detailed in Cause 3, but with a new cistern.
Winstar Hardware Tip: We offer a range of robust replacement cisterns and high-quality flexible connectors and fittings. Our team can advise on the best options for durability and compatibility.
Loose Connections
Sometimes, a cistern leaking is simply due to a loose connection. This could be where the flexible water supply pipe connects to the inlet valve, or even a loose nut within the inlet valve assembly itself.
How to Identify:
- Visual Drips: Look for visible drips or wetness around any threaded connections, especially underneath the cistern where the water supply line enters.
- Feel for Play: Gently try to wiggle the connections. If there’s noticeable movement, it could be loose.
DIY Fix: Tightening Connections
- Turn Off Water Supply: For safety and to prevent splashes, always turn off the water supply before tightening connections.
- Gentle Tightening: Use a spanner to gently tighten any visibly loose nuts or connections. Remember the golden rule: “hand-tight, then a quarter turn with a spanner.” Overtightening can strip threads or crack plastic components, creating a bigger leak.
- Check Washers: If tightening doesn’t stop the leak, the washer inside the connection might be perished. Turn off the water, disconnect the fitting, replace the washer, and re-tighten.
A simple table summarizing common leak symptoms and their likely causes.
| Symptom | Likely Cause(s) | DIY Fix |
| Water continuously runs into the toilet bowl | Faulty Flapper/Syphon, Faulty Inlet Valve | Replace Flapper/Syphon, Adjust/Replace Inlet Valve |
| Water overflows into the toilet bowl | Faulty Inlet Valve (Float set too high/not closing) | Adjust/Replace Inlet Valve |
| Puddle on the floor under the cistern | Worn Doughnut Washer, Cracked Cistern/Connections | Replace Doughnut Washer, Seal Crack/Replace Cistern |
| Hissing sound from cistern, no visible overflow | Faulty Inlet Valve | Adjust/Replace Inlet Valve |
| Visible drips from external pipe connections | Loose Connections, Worn Washers | Tighten Connections, Replace Washers |
Beyond the DIY: When to Call a Professional Plumber
While many cistern leaking issues can be resolved with DIY efforts, there are times when calling a professional plumber is the wisest decision:
- Persistent Leaks: If you’ve tried the DIY fixes and your cistern leaking continues, a plumber can offer a more in-depth diagnosis.
- Complex Internal Damage: Issues like a cracked cistern (if you’re not confident replacing it yourself) or major problems with the main water supply line.
- Lack of Confidence or Tools: If you’re uncomfortable with plumbing work or don’t have the necessary tools, a professional can handle it safely and efficiently.
- Leaking from the Wall: If the leak appears to be coming from inside the wall rather than the cistern itself, this is often a sign of a hidden pipe leak, which requires professional expertise and tools to locate and repair.
Maintaining Your Cistern: Prevention is Better Than Cure
A little preventative maintenance can go a long way in preventing a cistern leaking in the first place, especially considering Kenya’s varying water quality.
- Regular Visual Checks: Periodically check your cistern for any signs of wear, especially on rubber components like the flapper.
- Cleanliness: Keep the cistern free of excessive sediment or mineral buildup, which can interfere with the sealing mechanisms.
- Water Quality: If you know you have particularly hard water, consider using descaling agents periodically (ensure they are safe for plumbing components) or installing a whole-house filter if feasible.
- Quality Parts: When doing repairs, always use high-quality replacement parts. Cheap components might save you a few shillings now but will often lead to another cistern leaking sooner rather than later. At Winstar Hardware, we pride ourselves on stocking durable, reliable plumbing components built to last.
Conclusion: Stop That Cistern Leaking with Winstar Hardware!
A cistern leaking is a common household problem, but as we’ve seen, it’s often one that you can fix yourself with a bit of knowledge and the right parts. By understanding the common causes and following these simple DIY steps, you can save water, save money, and contribute to responsible water management in Kenya.
At Winstar Hardware, we are your trusted partner for all your plumbing needs. From durable flappers and syphon kits to reliable inlet valves, flexible connectors, and cistern bolts, we have everything you need to tackle that cistern leaking head-on. Our knowledgeable team is always ready to assist you in finding the right parts and offering expert advice.
Don’t let a drip turn into a torrent. Visit Winstar Hardware today and let us help you keep your water flowing where it should – not wasted down the drain!


2 thoughts on “Why Is My Cistern Leaking? Common Causes and Simple DIY Fixes”