In the lush highlands of Kiambu County and across Kenya, the rains are a vital and life-giving force. What if you harnessed this natural resource to significantly reduce your water bills and create a more self-sufficient home instead of just seeing the rains as a seasonal event? In a country where water conservation is both an environmental necessity and a financial priority, rainwater harvesting is one of the smartest investments a homeowner can make. It’s a simple, cost-effective solution that allows you to collect, store, and utilize this free resource for a wide range of household needs.
In this comprehensive guide, we’ll walk you through the anatomy of a rainwater harvesting system, the steps to set one up, and how you can benefit from it right here in Kenya.
The Anatomy of a Basic Rainwater Harvesting System
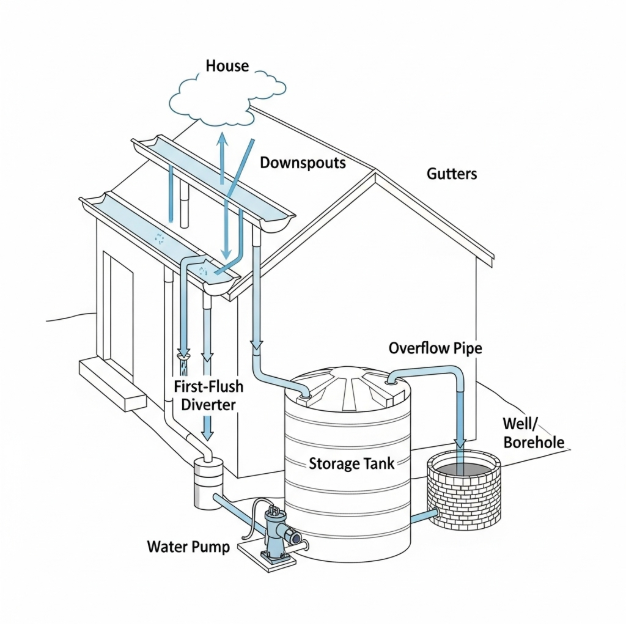
A rainwater harvesting system is a series of interconnected components that work together to capture water from your roof and store it for later use. Surprisingly simple in concept, each component plays a crucial role in collecting water efficiently and keeping it clean.. The four main components are the catchment area, the conveyance system, the filtration system, and the storage system.
1. The Catchment Area (Your Roof)
Your roof is the primary collection point where the rain lands. The material of your roof is the first thing to consider, as it directly impacts the quality of the water collected. A clean, non-toxic roof material is ideal.
- Corrugated Iron and Tiles: These are the most common and ideal materials for rainwater harvesting in Kenya. They are durable, readily available, and generally non-toxic.
- Thatch or Grass: These materials are not suitable for harvesting drinking water as they can introduce bacteria and other contaminants.
- Maintaining a Clean Roof: It’s important to keep your roof free of debris like leaves and twigs, as they can contaminate your water supply. Regular sweeping or a simple visual inspection before the rainy season can prevent a lot of problems.
2. The Conveyance System (Gutters & Downspouts)
This is the plumbing network that directs the collected water from the roof to the storage tank. How well you design and maintain this network determines your system’s effectiveness.
- Gutters: These run along the edges of your roof to collect the water. The material you choose matters. PVC gutters are a popular and affordable choice in Kenya, offering good durability and corrosion resistance. Metal gutters (e.g., galvanized steel) are more robust but can be more expensive. Proper sizing is also critical to handle heavy rainfall.
- Downspouts: These vertical pipes channel the water from the gutters to the tank. Securely fasten them to your house and fit them with screens to prevent large debris from entering the system. The downspout’s size should be proportional to the gutter and roof area to avoid overflow during a heavy downpour.
3. The Filtration System (First-Flush Diverter)
This is a crucial, yet often overlooked, component. The first 10-20 liters of water at the start of a rainfall often contain the most dirt, leaves, bird droppings, and other pollutants washed from your roof.
- First-Flush Diverter: This simple device automatically diverts this “first flush” of dirty water away from your main tank, ensuring that only the cleanest water is stored. It works by using a small chamber and a floating ball that seals the chamber once it’s full of the initial dirty water, allowing the subsequent clean water to flow into your tank.
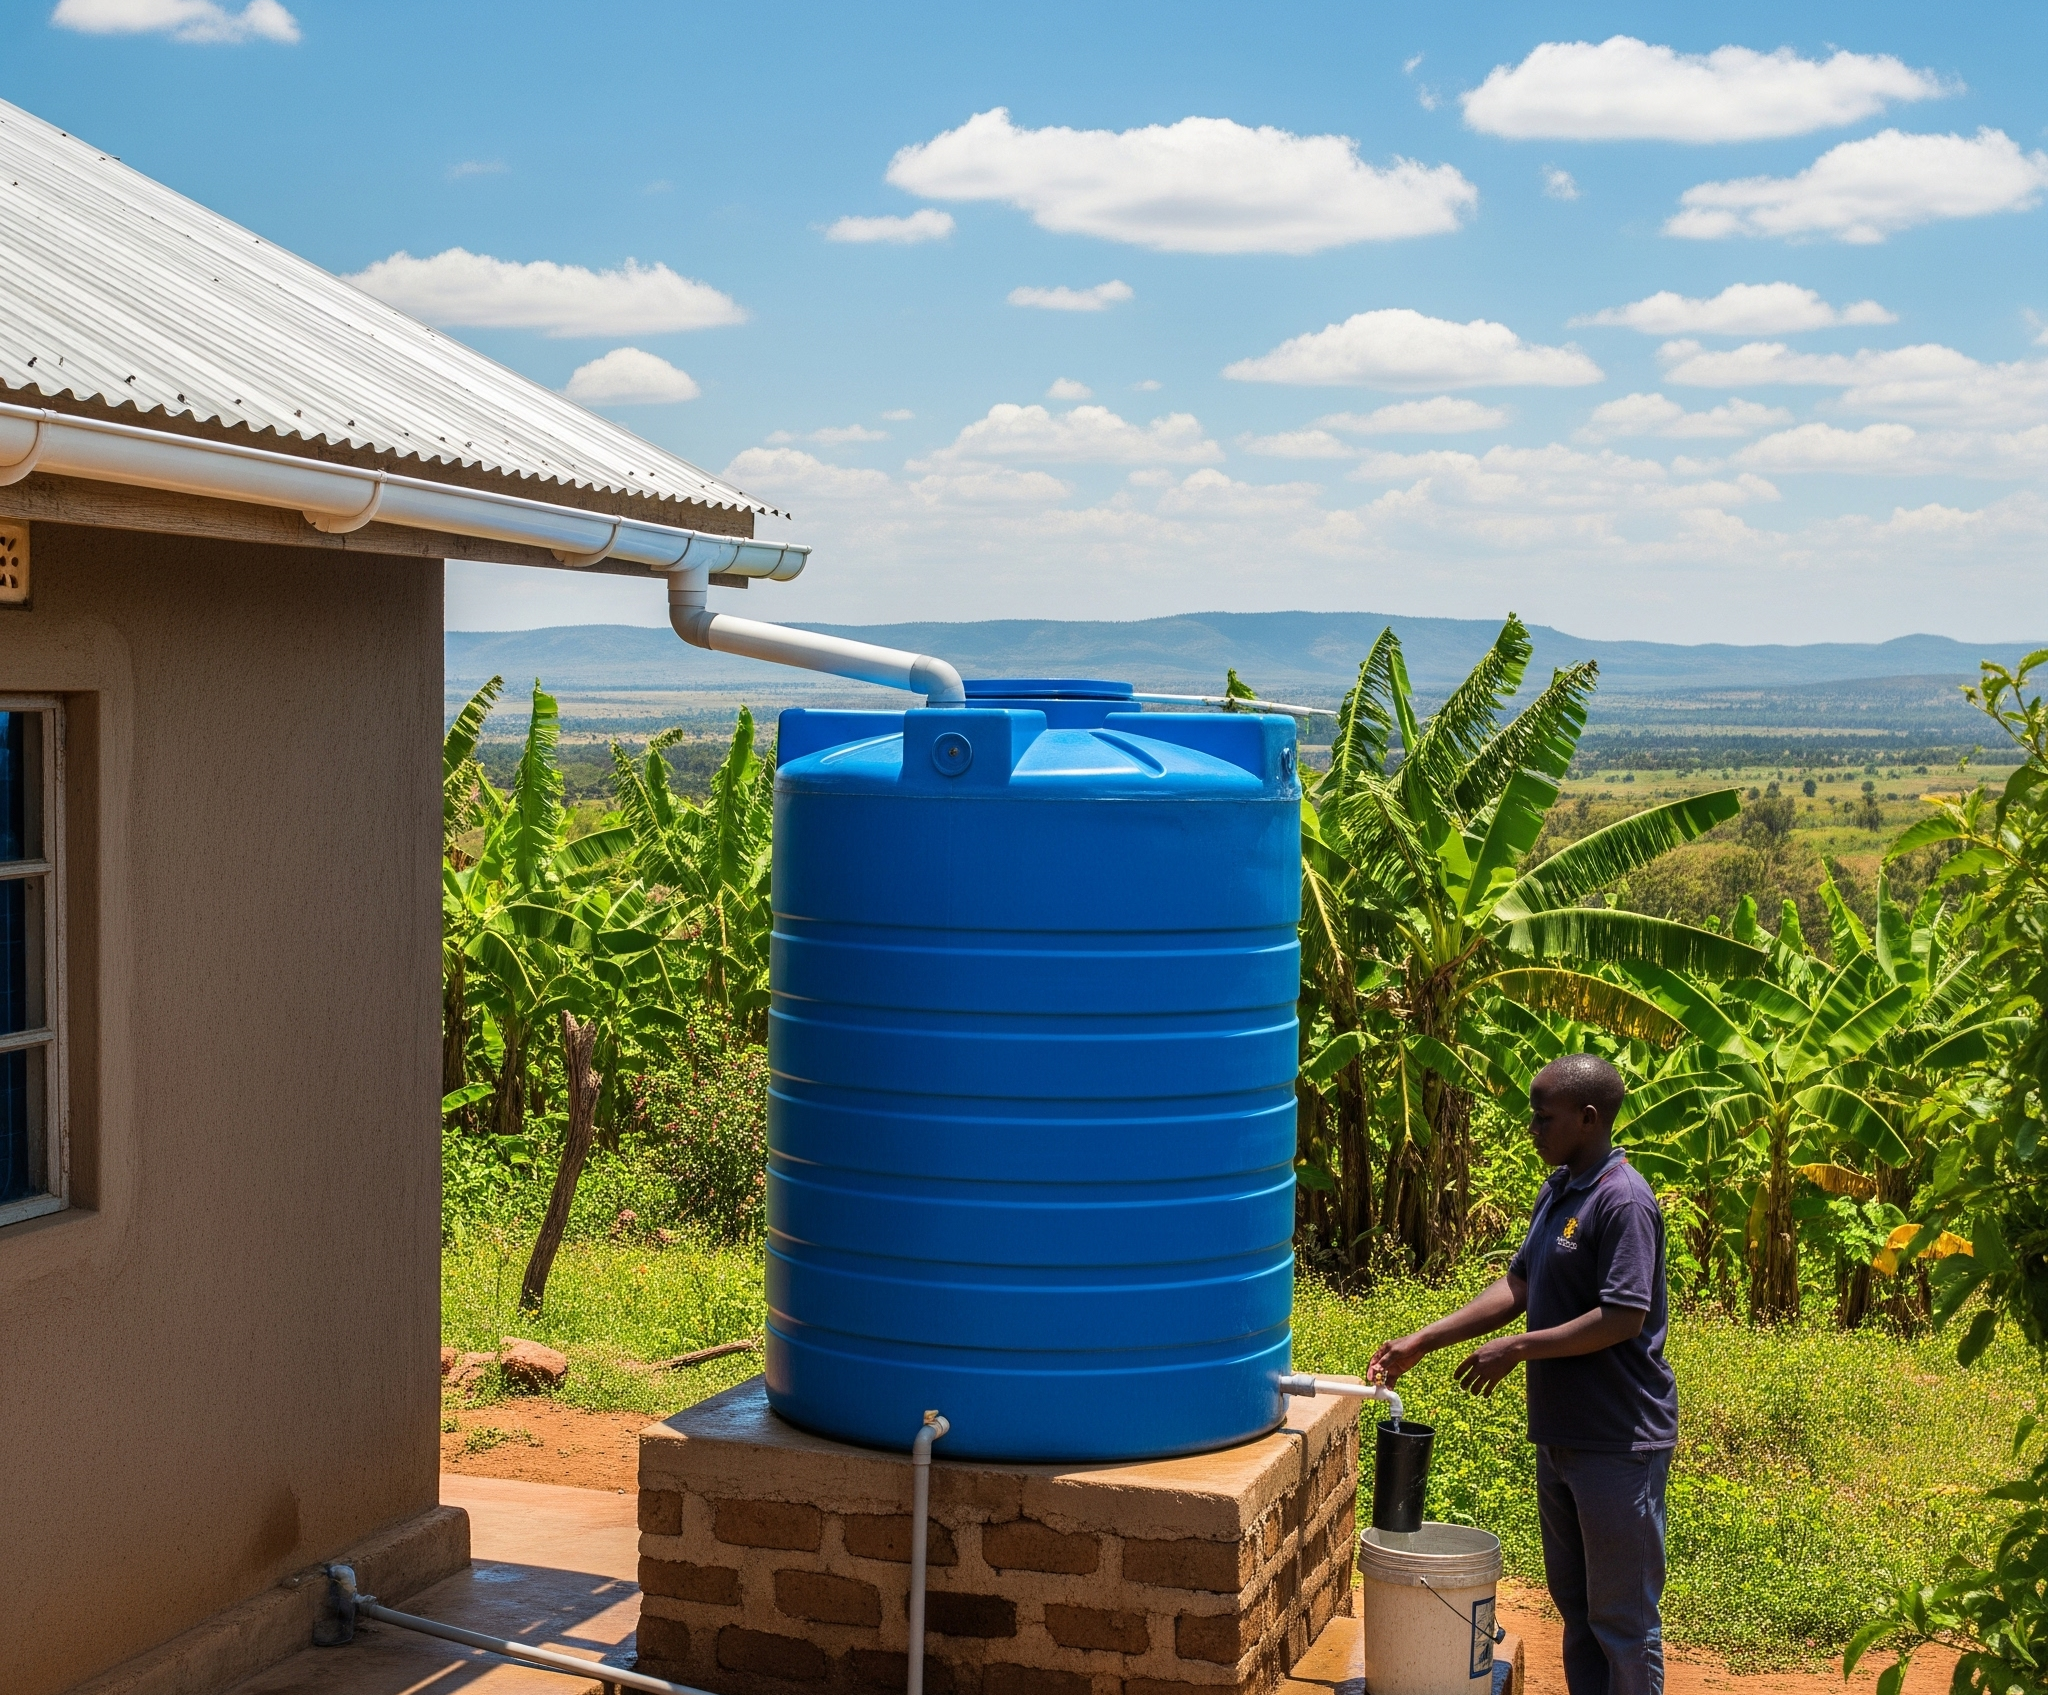
4. The Storage System (Tanks)
This is where you store the collected water until you need it. In Kenya, durable plastic tanks, often referred to as Jojo tanks, are a popular and reliable choice due to their affordability, UV resistance, and longevity.
- Tank Sizing: The size of your tank will depend on the size of your roof and your expected water usage. A professional plumber can help you calculate the ideal size. A larger tank provides greater water security, especially during the dry season.
- Tank Material: Besides plastic, other options include ferro-cement and masonry tanks, which can be custom-built to fit specific spaces. While potentially more expensive, they can also be very durable.
- Preventing Contamination: It’s crucial to use a tank with a sealed, light-proof lid to prevent algae growth and contamination. Place your tank on a solid, level surface for stability. Install an overflow pipe at the top of the tank to allow excess water to escape when the tank is full , and direct it away from your home’s foundation to prevent water damage.
Advanced Systems and Technologies for Rainwater Harvesting
While a basic rainwater harvesting system is a great start, homeowners can optimize their setup with more advanced components for greater efficiency, convenience, and safety. These technologies allow for better water pressure, cleaner water, and automated operation.
Pumping and Pressure
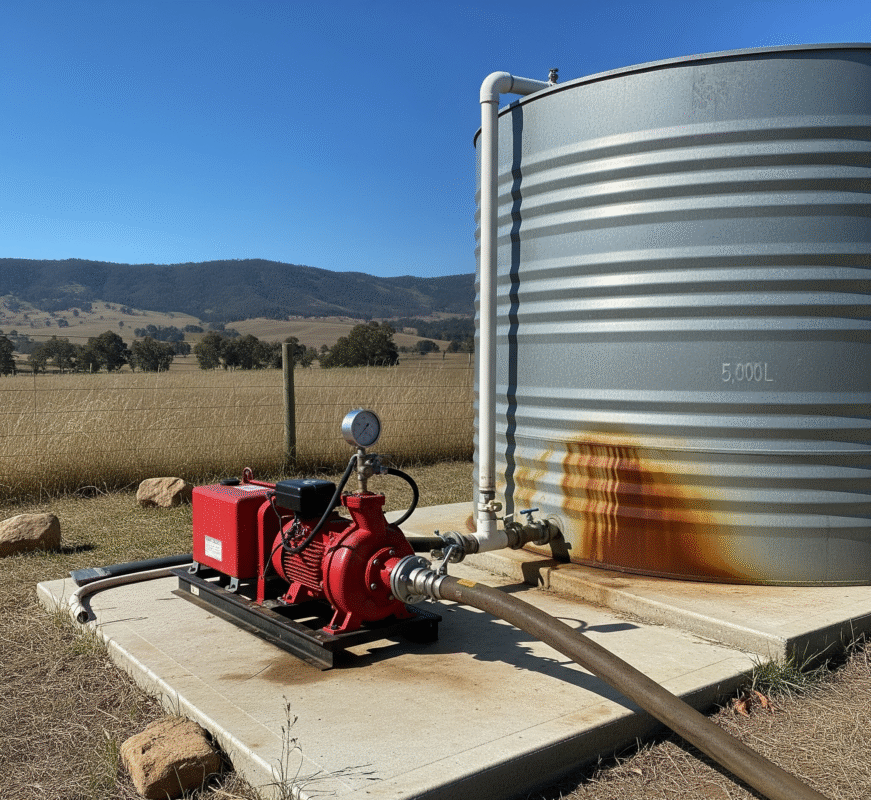
For a more convenient system that supplies water to a home’s pipes, you’ll need a water pump. The choice of pump depends on your system’s design and your water needs.
- Surface Pumps: These are placed outside the tank and pull water from the bottom. They are often less expensive and easier to maintain but can be noisy. They are suitable for systems where the tank is on a level with or below the home’s water inlet.
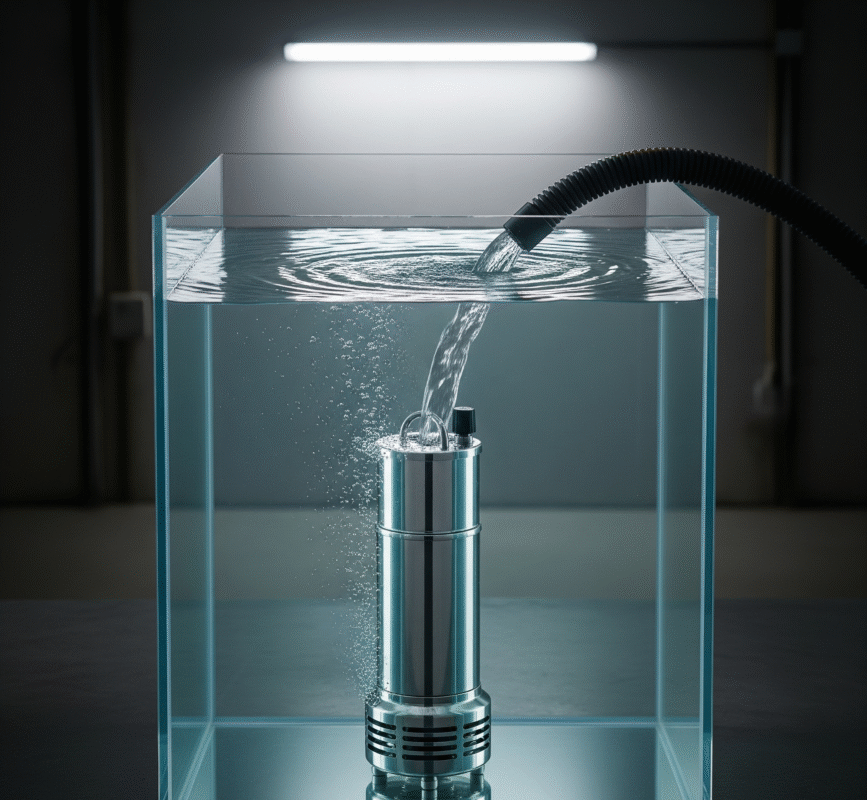
- Submersible Pumps: These are placed inside the tank, pushing water out. They are quieter and more efficient as they don’t have to pull water against gravity. They are ideal for systems where you situate the tank far from the house or at a lower elevation.
Multi-Stage Filtration
You can treat rainwater to make it safe for drinking by using a multi-stage filtration system to remove bacteria and pathogens.
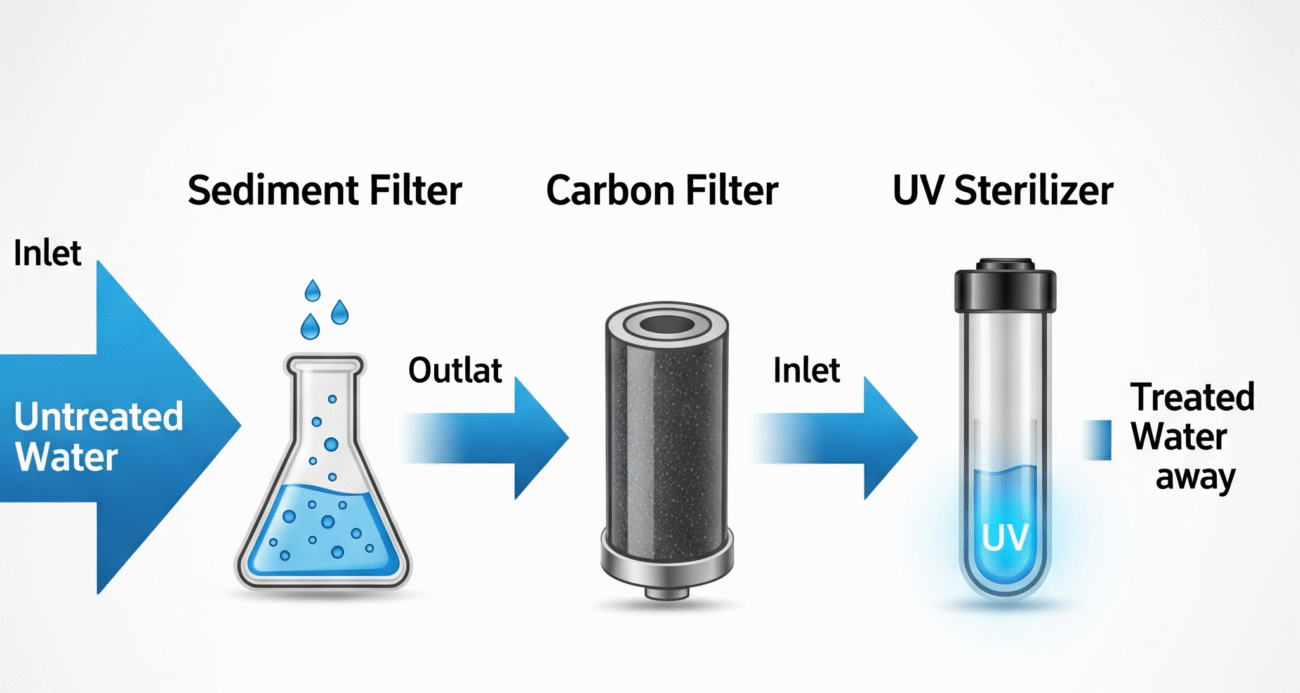
- Sediment Filters: These are the first line of defense, removing physical impurities like silt, sand, and other particles that may have passed the first-flush diverter.
- Carbon Filters: After sediment filtration, water passes through a carbon filter. This is essential for removing organic compounds, odors, and tastes, making the water more palatable.
- UV Sterilizers: For drinking water, a UV sterilizer is the most critical component. It uses ultraviolet light to inactivate bacteria, viruses, and other microorganisms, making the water safe for consumption without the use of harsh chemicals.
Smart Monitoring Systems
For modern and large-scale systems, smart monitoring can provide real-time data and automated control.
- Water Level Sensors: These are installed in the tank to measure and transmit the water level to a digital display or a mobile app. This allows you to monitor your water supply without physically checking the tank.
- Automated Switches: These can be integrated with the water pump to automatically turn it on and off based on the water level. This prevents the pump from running dry, which can cause damage, and ensures a consistent water supply.
- Rainfall Sensors: These can be used to automatically adjust the first-flush diverter, ensuring optimal collection during a downpour and preventing the diversion of clean water.
A Guide to Setting Up Your Rainwater Harvesting System
Setting up a basic rainwater harvesting system is a great DIY project, though a professional plumber’s expertise is invaluable for larger or more complex installations.
1st Step: Calculate Your Catchment & Storage Needs
- Roof Area: Measure the square meter area of your roof that will be used for collection.
- Rainfall: Estimate your average monthly rainfall (e.g., in millimeters).
- Calculation: Multiply your roof area by the average rainfall. For example, a 100m² roof with 100mm of rain could collect approximately 10,000 liters of water. This gives you a good idea of your potential yield and the tank size you’ll need.
2nd Step: Install Gutters and Downspouts
- Ensure your gutters have a slight slope (a fall of about 1cm for every 5 meters) towards the downspout to ensure efficient drainage.
- Securely fasten the downspouts to the walls of your home and add screens or mesh filters at the top to prevent large leaves from entering.
3rd Step: Set Up the First-Flush Diverter
- You typically install this at the base of the downspout, right before the water enters the tank.
- It’s a simple vertical pipe section with a ball inside that floats upwards as the first water fills the chamber, effectively sealing it off and allowing the cleaner water that follows to flow into your main tank.
4th Step: Position and Connect the Storage Tank
- Place your tank on a solid, level surface. To use gravity to supply water, you should elevate the tank.
- Connect the downspout directly to the tank’s inlet.
- Install an overflow pipe at the top of the tank to allow excess water to escape when the tank is full. Direct the overflow away from your home’s foundation to prevent water damage.
5th Step: Install the Delivery System
- For simple use, you can attach a tap to the base of the tank.
- For a more convenient system that supplies water to your home’s pipes, you will need a water pump and a filtration system to ensure the water is clean enough for household use.
Using Your Harvested Rainwater Effectively
Rainwater is naturally soft and ideal for many domestic uses, saving you from using your municipal supply.
- No Treatment Needed:
- Watering your garden, potted plants, and landscaping.
- Washing your car and outdoor cleaning.
- Flushing toilets.
- Washing clothes (the soft water requires less detergent).
- Requires Treatment:
- You can treat rainwater to make it safe for drinking. This typically involves a multi-stage filtration system (sediment filters, carbon filters, UV sterilizers) to remove bacteria and pathogens.
Maintenance and Troubleshooting
A well-maintained rainwater harvesting system will provide you with a reliable water supply for years to come. While the systems are designed for longevity, a little preventative care and attention to common issues can save you a lot of time and money in the long run.
Regular Maintenance
To ensure your system is running efficiently, follow this simple maintenance checklist:
- Seasonal Inspection: Before the start of each rainy season, conduct a full inspection of your entire system.
- Clean Gutters and Downspouts: Clear out any leaves, twigs, or other debris that may have accumulated. Clogged gutters can cause water to overflow and damage your home’s foundation.
- Check the First-Flush Diverter: Ensure the diverter is clean and functioning correctly. The mechanism should be able to seal off and redirect the initial dirty water effectively. If it’s a manual system, remember to drain it before the next rainfall.
- Inspect Pipes and Connections: Look for any cracks, leaks, or loose connections in your downspouts and pipes. Securely fasten any loose sections to prevent water loss and potential damage.
- Tank Inspection: Periodically check the tank for any cracks or leaks, and ensure the sealed, light-proof lid is securely in place to prevent algae growth and contamination.
Troubleshooting Common Problems
Even with regular maintenance, issues can arise. Here are some common problems and their solutions:
- Clogged System: If water isn’t flowing into your tank, the most likely culprit is a clog in your gutters or downspouts. Clear all visible debris and flush the system with a hose to dislodge any blockages.
- Algae Growth in the Tank: This is a clear sign that sunlight is reaching the water. Seal the tank’s lid completely and ensure it is light-proof. You may need to clean the tank thoroughly to remove the existing algae.
- Foul Odor or Taste: A bad smell or taste in the water can be caused by contamination from the roof or by a lack of proper filtration. Ensure your first-flush diverter is working, and consider upgrading your filtration system, especially if you’re using the water for drinking. You may also need to drain and sanitize the tank.
- Low Water Pressure (for pumped systems): Check the pump to ensure it is working correctly. The filter may be clogged and need to be cleaned or replaced. Low water pressure could also indicate a leak in your delivery system.
Why This Is a Smart Investment for Your Home
- Financial Savings: By reducing your reliance on expensive municipal water, you will see a significant decrease in your monthly water bills.
- Water Security: Having a stored supply of water provides a backup during supply interruptions or rationing, giving you peace of mind.
- Environmental Responsibility: You are doing your part to conserve water and reduce the energy needed to treat and pump water over long distances.
- Increased Property Value: A professionally installed rainwater harvesting system is a valuable asset that can increase the appeal and value of your property.
Get Your System Started with Winstar Hardware
Whether you’re planning a simple DIY setup or a complete residential system, Winstar Hardware is your one-stop-shop for all your rainwater harvesting needs. Our knowledgeable team is always on hand to help you choose the right components for your project.
Start making the most of every drop of rain. Visit us today, and let’s build a smarter, more sustainable future for your home!
What are your experiences with rainwater harvesting? Share your questions and tips in the comments below!


3 thoughts on “Conserve Water in Kenya with Rainwater Harvesting!”